The other associated posts are for the nerf dart gun holster and the holster pattern (if you need to make your own).
OPTIONS: I've made 1 of these for the back belt and 1 of these for the front belt.

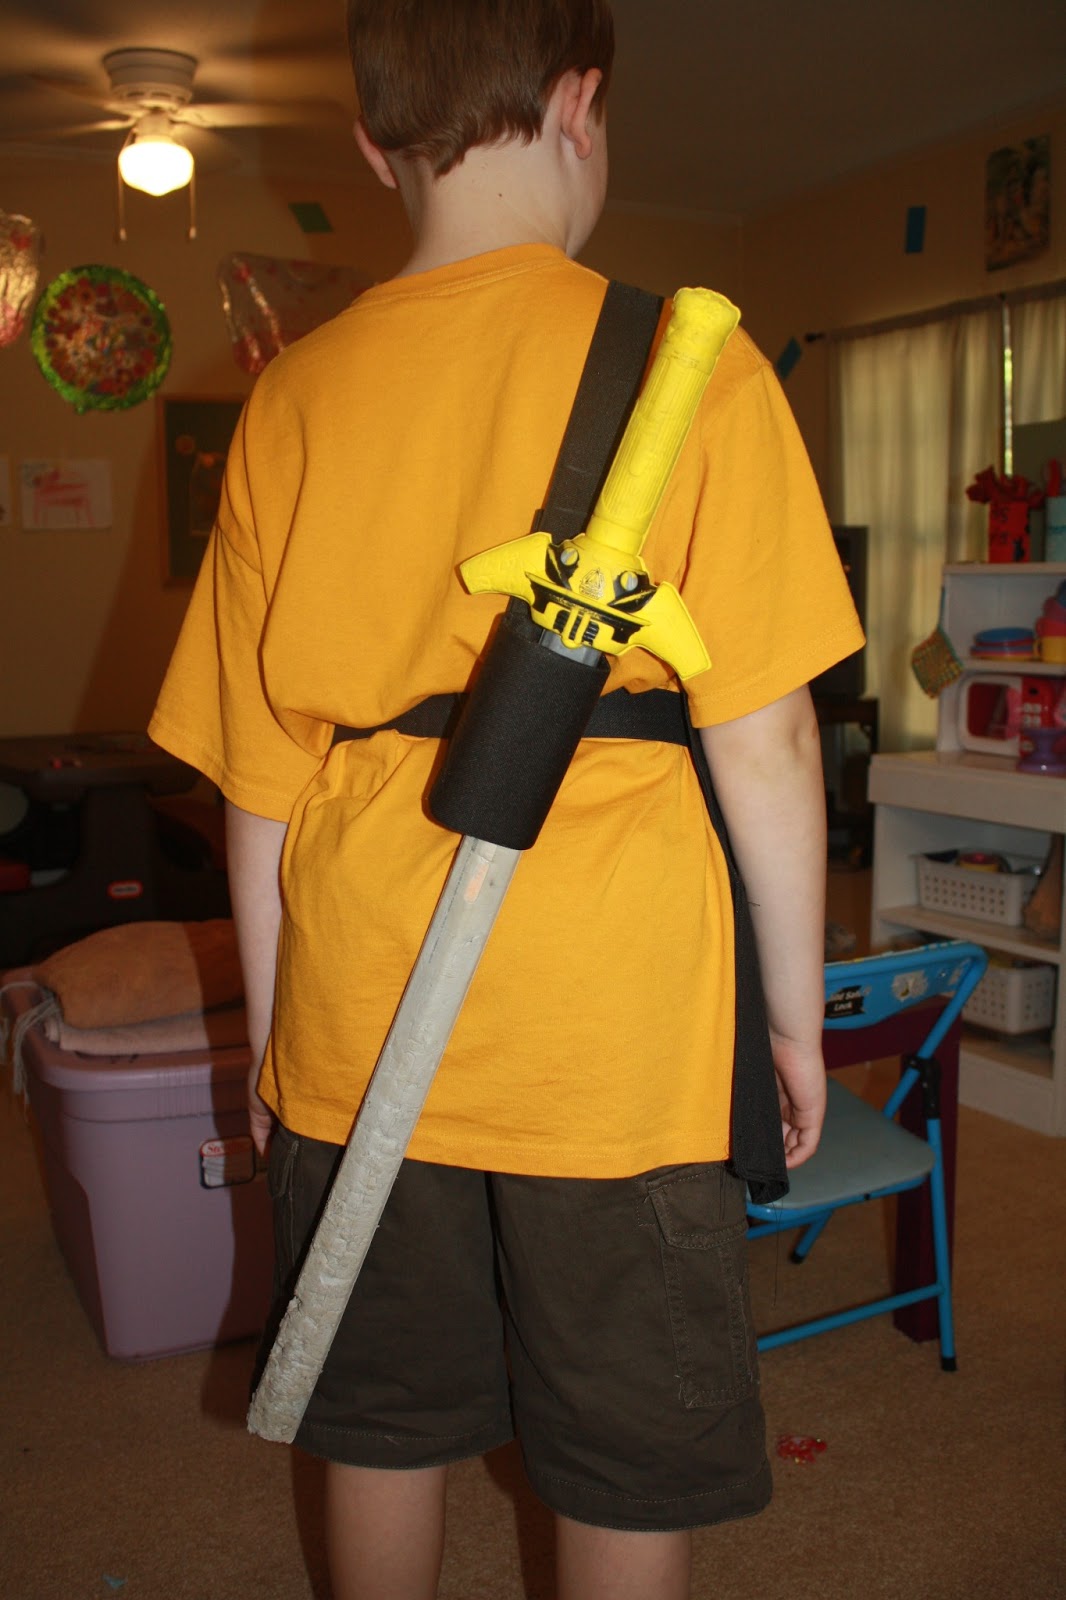 I like the look of it on the back, but it is hard for the child to get the sword into, especially if they're young. So the front may be the best choice.
Also, if the back belt is adjustable (as my 2nd time around was designed) or if you're going for a knight-look, you probably want to do it on the front.
If you're going for the ninja look or have a child with too many holsters on the front already (or if your child requests it), go for the back belt.
So, here goes.
You'll need -
some scrap of fabric (same as belt/gun holsters or different) - size depends on length of 'box'
plastic container (I used a crystal light container) - something not much bigger than the sword, but easy to cut
glue - the kind that will glue fabric to plastic and the kind that glues fabric to itself
snaps (or more glue)
1. First cut your container to the length you want. (for the back, I wanted it to be long so that the sword wouldn't flop around much and to have more 'holster' to guide the sword in the right direction. for the front holster, I wanted it to be small so that it could move around as the child walked or be put through quickly/easily.)

I used one of my husband's saws (hack saw?? - one of those sharp dangerous tools hanging above my dryer by the back door) :) Then, I used scissors/sandpaper to smooth it out...because I totally cut it crooked (thanks to my friend who helped this time).


Last time, I wanted it much bigger to make it easier to get the sword aimed in the right direction going through:
2. Measure around the piece you've cut. We'll call this c. Measure it's height. We'll call this h.

(for me, c = 8.5" or 8 1/2")

(for me, h = 1.25" or 1 1/4"...or close enough)
3. Cut a piece of fabric (c+1") wide x (2h +1/2") tall. Don't let the algebra-like phrasing confuse you - you do not have to solve for c - you already know it...breathe...relax.
My measurements were, c+1 = 8.5+1 = 9.5"
and for the height, 2*(1.25)+.5 = 2.5 + .5 = 3"

For the top edge of the 'crystal light' container, I cut a piece of fabric to be 4" h x 9 1/2" w
Yes, I cut an extra inch in height...I was testing something - and I had extra fabric, plenty of extra fabric...
(3.5 - you may finish the top/bottom edges of the fabric - these are the edges that are c+1" in length)
4. Fold this fabric in half sideways (so that c+1 is now halved) , right sides together and with 1/2" seam allowance, stitch ends together. You just created a 'ring' which should fit snugly around your piece - flip it right side out and TEST IT, yes, right now - with extra fabric sticking up above/below your plastic container piece. Ok, you can take it off.

You have options now. A, B, and C (A and B involve snaps, C does not require any hardware)
A - the sword holster has a snap on the back and snaps directly to the belt.
B - there is a 'belt' or 'strap' attached to the sword holster that will snap around the belt and snap to itself (to visualize, think: wristwatch)
C - there is a strap attached to the sword holster (in a ring or loop) that the belt can go through
My insanity got the best of me and there is a comparison chart on these options at the bottom of this post. :)
[Begin option A]
A5. Add a snap to the seam side of the fabric 'ring' so that it's snapping end is sticking out of the 'right side of the ring' and the cap (decorative part of the snap) is on the raw seamed edges inside your ring.

A6. Place your plastic ring into the fabric ring and fold the excess towards the inside. (I recommend folding in the bottom excess first as the top needs to be smoother so the sword doesn't catch on a piece of glued down fabric everytime you insert it into the holster.) If it fits well, unfold, add some glue all inside and glue it down.

Because this one was so tall, I did not make it twice the height plus and inch - I just added 1/2" to 1" to each end and glued in the ends. I didn't want to try and put glue down that skinny tube!
A7. Add a snap (or several if you want it to have location options) to the belt wherever you want this holster to attach onto.

[This is the end of A - if you chose this method, you are done.]
[Method B.]
B5. Cut a piece of fabric about 4" wide and long enough to go through the holster and fold around - top and bottom - onto the inside of the belt.
(no pictures because I had extra 'strap' from making the actual belt strap - if you want pictures - see the strap post)
B6. Fold the long edges of the fabric piece to the middle and fold again in half so that this piece is now 4 layers thick and 1" wide. (Just like we did for the strap.) Again, seam the open and closed long edges and another stitch down the middle. You can also finish the ends of this piece however you like.
B7. Add a snap to each end of this 'strap' - they should be installed so that one overlaps the other when the strap is connected in a circle - like a ring.

(I actually added mine last so that I could size the belt better - I made this up as I went - and then I forgot to take pictures of that...and the gift has been given, so sorry - no pics for this part!)

B9. Place your plastic ring into the fabric ring and fold the excess towards the inside. (I recommend folding in the bottom excess first as the top needs to be smoother so the sword doesn't catch on a piece of glued down fabric everytime you insert it into the holster. Also, the snap-strap needs to be on this top excess that is folded in last.) If it fits well, unfold, add some glue all inside and glue it all down. (glue the ring to the fabric and glue the snap-strap more firmly in place along the inside of the ring.


You can now attach the sword holster anywhere you like along the belt - just snap it on like a watch/bracelet would to your arm.
[This is the end of B - if you chose this method, you are done.]
[Method C]
This is the only one with no pictures - don't despair - next time I make this - I'll use this method so I can take pictures. :)
This is the only one with no pictures - don't despair - next time I make this - I'll use this method so I can take pictures. :)
C5. Cut a piece of fabric 4" wide and 2h + 1" (remember h is the height of your plastic ring)
C6. (As for the belt and also as in B6 - fold this and stitch it to be 1" wide and the same 2h+1".) In other words, make it into a mini-strap.
C7. Finish raw edges if you like, then align the raw edges of the mini-strap with the raw edges of the fabric ring - the mini-strap should cover the seam of the fabric ring and should be on the right of the ring (not over the seam allowance of the ring)...lastly - your mini-strap will be 1/2" longer than the fabric ring - just let the extra gap in the middle.
(This extra will allow your strap to go over the buckle)
C8. Place your plastic ring into the fabric ring and fold the excess towards the inside. (I recommend folding in the bottom excess first as the top needs to be smoother so the sword doesn't catch on a piece of glued down fabric everytime you insert it into the holster.
If it fits well, unfold, add some glue all inside and glue it all down. (glue the ring to the fabric and glue the mini-strap more firmly in place along the inside of the ring. Let the outside of the mini-strap, which should gap away from the plastic ring a little, be free of glue.
Now, you can slide it on past the buckle to wherever you want your sword holster to be.
(optional - you could add a snap to this mini-strap where it will meet the inside of the belt, but this doesn't give you much advantage over doing method A - it's really just combining the two for more work, but it is an option.) :)
This is probably going a little overboard, but I couldn't help myself...

No comments:
Post a Comment