Showing posts with label sew. Show all posts

Thursday, November 5, 2015

Gymnastics short (which became a gymnastics skirt)

I don't like just leotards by themselves. I don't like seeing panties stick out around the leg holes, I don't like seeing them do splits and such in them...I want more coverage, but I know they need to be able to move around and have something that's stretchy to stretch with them.
I couldn't find the shorts I was looking for (of course, when I'm willing to pay, I can't even find what I'm looking for...except online, but what if it doesn't fit?)
So, I decided to sew them.

I still prefer shorts, but one of my twins asked for hers to have an attached skirt, so I altered the plan.


For the 2nd pair (purple), I used a pair of biker shorts to make my pattern.
(We call them "legging shorts" because they wear them under skirts and dresses like you would leggings, but not for show, for coverage when they are being kids).

I probably could have just told them to wear the legging shorts as gymnastics shorts, but they looked funny and the older girls are already 'short' on shorts - and I couldn't guarantee the pair they needed would be clean on gymnastics day.

Anyways - enough talk - this isn't intended to be a tutorial b/c I don't have time for that right now. It's just pictures to show my process. If you just need a little nudge worth of instructions, this should help.

Settings on my serger that worked best while sewing these:
 (I have a Janome very basic low cost serger)

Inner leg seams
 Ready to sew crotch seam
 Pin to keep seams aligned
 Crotch seam done - I almost always sew the seam then serge in case I need to adjust anything and so things don't move around.
 Once you serge, it's essentially permanent
 Shorts ready for seam and waistband
 Waistband (14" long folded, so 28" wide and about 5" tall)

 Serge edges (right sides together)
 Serged leg bottoms
 Flipped waistband right side out
 Folded in half (so seam is hidden in fold)
 Sew along bottom cut edges (baste)
 Then serge them
 Why are my pictures out of order?? Back to shorts - used twin stretch needle to hem shorts.
(I couldn't get the seam not to "tunnel" where it bumps up between the rows of stitches, but whatever!) A skill I'll work on later.
 Picture of the twin needle in case you need to sew what to shop for. I only use it to hem knits really, so it's lasted a while. (I probably should get a back up for in case this one breaks mid-project, but I expect it to last a long time and not wear out like my other needles do because I use it so little.)
 Circle skirt - there are a bazillion tutorials on how to measure and plan these, so I won't go into that.
(I think my measurements were about 4" down and then 10" down? Don't quote me on that...your measurements will be for your waist and your waistband.) Ideally, the circumference of the small circle will be the same as whatever the waistband of your shorts is.

Formula for circumference (the measurement around a circle - in this case, the side of the inner "donut"):
C = 2 x pi x r 
(r is the radius of your "inner donut" - the measurement from that folded corner to where the paper begins)

Pin it at the sides, back, front, and half way in between those to evenly space the skirt onto the shorts.
Sew on (right side of skirt and right side of shorts both facing up)
 Do the same pinning with the waistband onto the outside of the shorts/skirt (raw edges together)- front and back, then sides, then eighths.
Then sew, stretching either the waistband or the skirt as needed to align them.
 I sewed it on then serged it all.
 Flipped up
 Sewing directly onto elastic keeps it slightly stretched out, so I wrap the elastic around my child's waist and then make it a little tight. Cut it and sew it into a loop.
 Once last time with the pinning in 1/8's around the skirt.
Sew it on (I start at the back by the way) - zig zag stitch - narrow enough to fit on the elastic (1/4")
  You will have to stretch the elastic as you sew - this is good and will keep the skirt tight so it won't fall off.
 Elastic sewn right onto serged seam allowance. (the waistband is flipped down so you can see/get to the seam allowance)
 Flip the waistband back up and it's done.
 Finished skirt - still need to get a pic of her wearing it.
 Here's my other daughter wearing the skort I made for her.


Monday, February 3, 2014

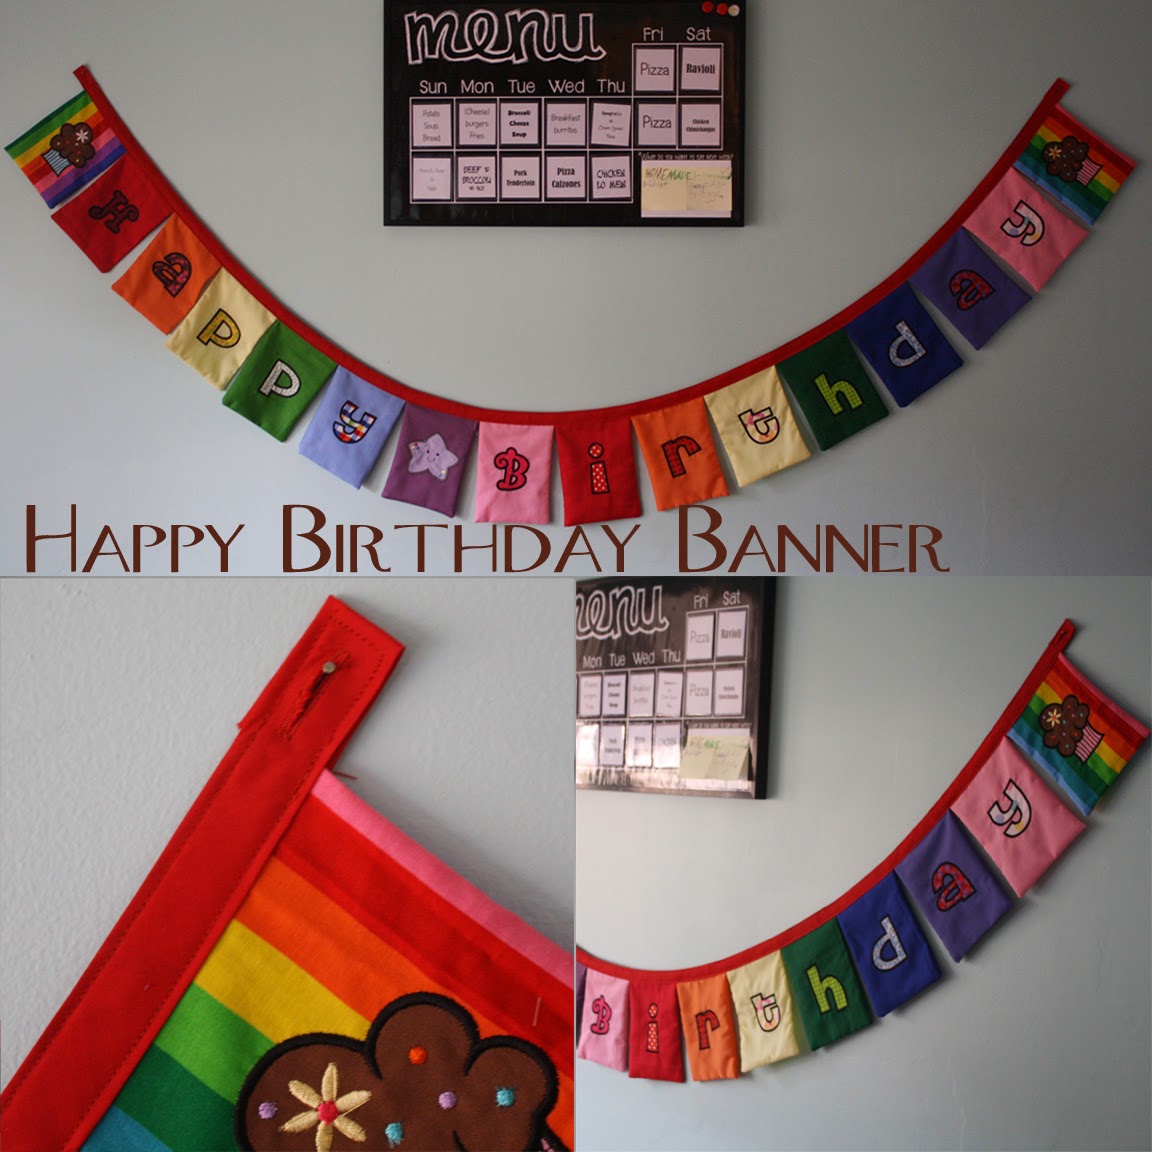
Happy Birthday Banner


Finally - after having a lot of these fabrics bagged for several years, I finally got around to doing this project!

It was an idea I think my mom saw someone else make for their house and told me about. I loved the idea of a durable reuseable birthday banner, and not wanting to make one every time I had a different color scheme (or a different child's favorite color birthday), I decided to go rainbow theme. 


I have mostly girls (and my one son recently had a party, so he won't be due for another 4 years...plenty of time to do something else - or nothing at all because teenager boys don't have decorated parties, right?) ;)
Plus, the next three parties (girls of course), I have in mind themes that would be perfect for rainbow.


I used my embroidery machine to applique each letter on a scrap of fabric. Then I sewed a backing/lining (right sides together and flipped of course), leaving the top open. I thought about top stitching around each of the finished rectangles (about 5"x7" finished), but I would have had to fight with clear thread or keep changing my thread or have white stitching around each rectangle and I didn't want any of those.


Then, I just sewed them all touching into a length of extra wide double fold bias tape. (It only took 1 3-yard package, with some leftover.)


I put buttonholes in the ends to make it easy to hang from whatever.


Cute, right? 
(And I used all stuff I had in my leftovers box or general supplies, like thread. So, it wasn't free, but it "felt" free!) :)

Oh, I should post my updated menu board. (Too bad I left my kids' tacky request postits up for this picture!) oops. Anyways -  I really like my new method for the menu board! I'll try to remember to do that next and not make you wait another 4 months for a post!

Thursday, June 27, 2013

Hooded Towel

When I was little, I used to have a hooded towel (and so did most of my brothers). My oldest son got one from one of the baby showers I had for him. I wanted towels for my girls as they each grew too big for the baby towels. 

My mom made one for my first daughter, but then I had two more, so it was time to figure it out. I mean, it's just some towels sewn together - how hard can it be?

Turns out, it's not hard.

 And it's an easy present to make that doesn't cost much, but will get years of use.

My mom lines the hood, but I prefer it unlined. 
(If they grab it wrong the hood separates from the lining, making it look like 2 hoods sewn shut at the opening...so confusing, especially for my kids. But it does hide the seam in the hood.) 
You can do it either way - but you have to figure out lined on your own b/c I'm not showing it today. :)

You'll need:
1 bath towel
1 hand towel
thread (to match towel)
ribbon, rickrack, or other decoration to cover a seam (at least as long as the longest side of the bath towel)

Because I have an embroidery machine, might as well make use of it!
I do that first.


 (When embroidering on terrycloth, use water soluble stabilizer on TOP of where you're going to embroider. or else your stitches will get lost in the loops of the towel fabric and it won't look as crisp. I don't bother with any other stabilizer. The towel's got enough stiffness as it is - try cramming it in a hoop.)


You'll want to trim the stabilizer as close as you can to the design and then put the towel through the washer/dryer (which hopefully you did before you started this project also).
If you leave the stabilizer all on there, it turns into a sticky globby mess that just can't all wash off and you will do more work trying to get it off than if you just trimmed it to begin with!


Now, let's start cutting/sewing.

Then, I cut my hand towel down smaller (it will be your hood). 

First fold it in half (hamburger style).
then, trim off some from the side and some from the open end (opposite the fold).

The amount depends on how big a head you're going to put in this towel.


(You only need the top right piece. The others are shown so you can see how much I cut off.)

I found a guide once that suggested how much to cut off of each side. It used the band (the lines going across the hand towel that I cut along) - and told how much of the band to cut off depending on baby, toddler, child. And suggested 4" off the side.

I cut closer to 5 1/2" off the side since this is for a 1 year old and because even my 6 year olds still have head space left in their towels (which I cut at 4"). I think the 10 year old finally fills up his hood. 

You only need about 1/2" for seams.

Now, toss those other two pieces (or save them for something else).
If you can tell which is the front/back, fold it right sides together.


Stitch along the side (left cut side shown in picture above)
If you have a serger, use that. Otherwise, do a straight and a zig zag stitch.

 Now, open out your hood so the seam is going vertical and facing the table and lay it on top of  one of the long edges of the bath towel, overlapping about a 1/2" (more or less - doesn't matter)

NOTES:
The hood and bath towel should both be wrong sides facing the table.
The hood should be ON TOP of the bath towel.
The center seam of the hood should be aligned with the center of the bath towel - 
The hood seam should be perpendicular to the long side of the bath towel (perpendicular means it makes a T).

PIN IN PLACE

Sew hood onto bath towel, keeping the overlap amount constant.
I sew along the bottom edge of the hood.

Then I flip it over and sew along the top edge of the bath towel (so there are two *mostly* parallel seams keeping the hood attached to the towel).

See? Now you just need to cover the rough edge of the hood

I sewed rick rack onto this one, but I have also used grosgrain ribbon. You could even used a strip of fabric with the two long raw edges turned under.
Be sure to turn under the ends of whatever trim you use so they don't fray at the edges of the towel (or wrap it around to the other side of the towel at each end and sew in place.)

 *This is obviously not being modeled by the 1 year old I made it for, but I had to take a picture before I gave it to him at the party. Clearly, it will grow with him. :)


Last note - if you don't like the point at the top of the hood, you can (from the inside or wrong side), flatten the point into a triangle and sew across the base. (If you've ever boxed the corners of a bag - same concept.) Then either leave the triangle or zig zag/serge along the seam and trim off the triangle.) I kind of like the point...but just giving options.