Monday, November 17, 2008

Quick Treat Bag (Halloween)

Ok, this really is my last halloween related post for the year. I forgot I made some bags. I have two pumpkin buckets, but I now have 4 children that are capable of saying "Trick or Treat!" and I don't like the flimsy handles on the new pumpkin bucket and I wanted something flattenable (I know that's not a word.) I'll tell you like I tell my husband: I like to make up words and it sounds exactly like what I'm trying to say!

Oh, last reason for the bags...I have an obsession with bags!


Take a sheet of felt (usually 9x12 I think). Trim off an inch from the short end. Do this for two pieces (same color if you want your bag to be one color; two if you want back/front to be different). Save this inch wide strip from each sheet - they're your handles.

100_8379

Find an image online and scale it down to be no wider than 6-7" wide or 8-9" tall. My son wanted a bat. Pin it to the color felt you want it to be and cut it out. (Silouettes work best - things without detail work...unless you like to complicate things.)

100_8380

Top stitch it to one piece (centered side to side, and slightly above the top to bottom center). 100_8381

With image (you just sewed) between the sheets, sew the two sheets together around sides and bottom.

100_8384 

now to "box the corners". Do you know what the means?

If not...

pinch one bottom corner so that the side seam is "flattened" and aligned with the bottom seam. Can you tell by the picture? (The seams must be aligned or your bag will be crooked!)

100_8385

Measure across this "flattened" triangle/corner. Find the spot where it is 2" across. (To keep it perpendicular to the stitching, or in other words, to make sure the tape is straight across the corner, see that the line of stitching is crossing the 1" mark both above and below the measuring tape.) See picture.

it was exactly centered...but the picture is not as perfect as it was when I did it without the camera in hand!

Draw a line above the measuring tape (with a fabric marker if you want it removable).100_8388

Sew across this line.

100_8389

Repeat for other corner.

  100_8383

At top edge, place ends of strip 1" from side seam, overlapping bag about 1/2". Sew in place. (Make sure handle is not twisted and that both ends of each handle strip are attached to the same side.

100_8390

Done. No need to finish seams, hem the top, or provide much stability - it's just a quick treat bag - and you can make a new one every year to match your costume with 3 sheets of felt! (that's like 60 cents)

I forgot to take pictures of them before I put them away. (I made pretty generic ones that could be reused with any halloween costume) - a jack-o-lantern face, a cat, "boo", and a bat - the bat and cat came off of google image search (I love that thing!)

100_8497 100_8499

Penguin Costume

Yea! Last halloween costume post for 2008! And I've got about 10 minutes to write it before I have to go (thank goodness my husband set up windows live writer so I can leave it sitting here for a while b/c that so is not happening)!

This was by far my favorite to make!


100_8455100_8457100_8456

Need:

white fleece

black fleece

1/2 yard of 1/4" foam (I got 1/2" 'cause that's all they had!)

elastic pieces (I used 3/4" wide strips for arms under wings)

2 white buttons

white and black thread

white long sleeved shirt (or short sleeved if it's hot where you live)

For the jumpsuit:

For the jumpsuit, I found a pattern appropriate for fleece (McCalls 5508, view C, size 1, shortened).

To alter the top of the wing so that they can be sewn onto the hood (as if they were pieces of a sweatshirt "hoodie"), I pinned together the arm, back (half), and front (half) pattern pieces for the sweatshirt (all the pieces that would have been sewn together to create the hooded sweatshirt). Then, I traced onto tracing paper the shape created by the top (and extended it down several inches). Then, I laid this new "pattern piece" under the wing, aligning the tops and 'blended' the  neckhole down to the sides of the wings to make it look as smooth as possible. (That was probably confusing...I confused myself while doing it!) I basically just wanted to make a hoodie, but I didn't buy enough fabric and didn't know how I'd turn the arms into wings anyways, so I made the top of the wings 'fit' the bottom of the hood. Maybe there is an easier way (like measuring the bottom of the hood piece, but I wasn't sure if the curve would work right!)

Here's a picture to help the confusion!:

scan0007

I cut out the front and front facing along with 2 wings from the white fleece. I cut out the back pieces, the hood, back facing, and 2 wings from the black fleece (I got what the pattern asked for, assuming you were making a normal single color jumpsuit, but of each color.)

100_8391

Then, just follow directions to make the jumpsuit and hood (part of the hooded sweatshirt). Don't bother making buttons on the sides of the jumpsuit - it's easy to slide the kid into and there's no way to make button holes (with my machine anyways) through all those layers of fleece! Just sew that part together permanently!

I don't remember what the front of the hood was supposed to be like, but if it doesn't have you make a casing to put some string through, do that. (Just hem the very edge of the hood front, then turn to the inside about 1/2" and sew close to the inner hemmed edge to make a casing to put string/ribbon through later.) I think the pattern had you make a casing though...follow its directions if it did.

For the wings:

I made a pattern using her measurements. I made it the length of her arm from shoulder to wrist and a proportionate width (about 17" tall by 10" wide). See picture for idea of shape.  Then, I altered it (as explained above) so that it could be sewn onto the hood bottom.

100_8272 

On the right side of the white fleece (does fleece have a right side??), sew a strip of 1/2" or bigger elastic about 3/4 the way down the wing (about where the forearm will be).

Sew the wings, right sides together along the long outer curved edge (not the top curved edge). Turn right side out. Stuff with foam (cut to wing shape, and trimmed to fit inside). Baste top edge shut.

Pin black side of wings (side by side) to outside (right side) of hood, centering hood between wings.

Here are the wings (already sewn and stuffed) and pinned to the hood. Hard to see...well, that's too bad.

   100_8399

Sew with 1/2" (or whatever you like, really, just don't expect smooth sewing if you go through the foam). Flip your hood up. Slip a ribbon through the casing made in the hood. (This is to tie under the chin.)

100_8400   

You're done. Chase her down and dress her. (If you have some black patten sunday shoes, that's a nice touch - or better yet, some orange webbed shoes...yeah, didn't think so. Me neither.)


NOTE:

simplicity does make a penguin costume pattern to purchase. And it was even in the book this year, but not until after I had already bought my supplies and planned this out (other wise, I most certainly would have just done that!) When I first started looking it was listed online as "out of print"...guess it got "back in print"? 

Sunday, November 16, 2008

Bat Costume

100_8451 100_8452

Ok, for this one, I used someone else's idea for the bat wings, and altered it to suit myself.

The ears, I made up.

Base:

Black toboggan

Black sweatsuit (or whatever's cheap)

and he wore black crocs he just happened to have from the summer


Need:

1 2/3 yards black fabric 58"(mine was something on sale in the halloween costume blacks) - I forget the name?

if it's 45", you'll need about 2 yards and a slightly different layout

14 buttons (more or less, this is what I chose)

foam (the flat craft kind)

For the fabric, this is the layout for cutting out the wings:

batwings layout batwings 45

(The rectangles were going to be for something else and I didn't use them afterall.) You could probably get less than 1 2/3 for the 58/60", but I got that much b/c I had the same rectangles at the bottom for something else.

For the pattern for the batwings:

I found it online almost 3 years ago and printed it to file. (Along with several others, including the hood pattern I mentioned in the owl post. Yeah, the one I looked at, read over, then pretty much ignored.) I decided to try to refind it today, and I did!

Here's the link:

http://www.denverfabrics.com/pages/static/halloween/halloween.htm

The only difference I did was to add about 5/8" along all the edges for a seam allowance since I used a 'fraying fabric' and had to line my bat wings. I used 3 buttons along the wrist/elbow/underarm, 2 buttons down the side underarm/waist, and 2 down the pants knee/ankle. - 7 total down each side of the body.

Scroll down to "bat wings or padded wings" for the batwings pattern. (I printed it to a .midi file a few years ago and then copy and pasted it to word for easier printing this year.) They have good pictures and easy explanation.

For the bat ears:

I cut 4 pieces of the same black (wing) fabric in tall curved triangles. (sorry, no pattern...I wasn't thrilled with the shape, so I didn't bother to save it.) I cut 2 pieces of foam slightly smaller on all sides, same shape.

With right sides together, sew two pieces of fabric together along curved sides (leaving bottom edge open). Turn right side out. Insert foam pieces.

100_8401

Using a seam ripper, open the top of the toboggan. (There is another option.)

100_8402

With toboggan inside out (and laid flat), insert ears so that raw (bottom) edges of ears align with  the raw (recently opened) edges of the hat - ears in between the hat layers. I had ears side by side, touching.

Baste (and check to make sure the ears are where you want them and you caught them in the stitching.

Stitch across opening (on the inside) several times. If you have a serger (and can figure out how to use it today), that wouldn't be a bad idea to use on the hat seam.


Other option:

A less messy way (meaning, you don't have to rip open the $1 toboggan you got from walmart) is to hand sew the ears into place on the outside of the hat. You may want to finish the bottom or use fabric that doesn't fray. I might post the mouse ears later (2006 costume - boy, 4). I used this method then - with felt fabric and foam for support.

Cat Ears

Since Carolyn's birthday is tomorrow, I'll post cat ears next.

We had some we got at Target with the tail (pictured) two years ago, but when it was time to pack up and leave to go out of town, she couldn't find them. She said they were broken and she'd thrown them away. I said, I took them out of the trash and I was going to fix them. She insisted she tossed them. (We found them later...it just needs one of those hard headbands replacing the broken one.) But, for the time, I needed cat ears, and something non-breakable!

So, in the 30 minutes I had left, I had the 'opportunity' to sew Cat ears from leftover fleece scraps (from the penguin costume). So, this was a hurried project and is less than perfect...and I made it up as I went (unusual for me!) I would make the ears smaller next time...

The Cat Costume:

100_8458

Black clothes, bought tail (although those are easy to make too) and  face paint if you're into that (we're not). She did not wear those bedroom shoes out the door, although I did make them  - last year, I think? That would be another post...if I feel like it and can remember what I did?

Cut 4 triangles of black fleece (or felt) and 2 triangles of white fleece (felt).

100_8406

I cut them the same, then trimmed down the white.

100_8408


Sew the white triangles onto 2 black triangles (topstitch).The bottom was about 6 inches and the top sides about 5"...bigger than I expected in the end. I would make them smaller for a child.

100_8411 Sew each pair of black triangles together with the white (already sewn on) sandwiched between, leaving bottom open. (Yes, I sewed the entire perimeter except for an opening for turning, but this is not necessary and my brain just didn't have the foresight to see this...I was in a hurry!

100_8412  100_8414

Turn right side out.

100_8415

Pin together elastic in a circle - use a SAFETY PIN!

(I measured my daughter's head to have an idea of how big to make it.)

100_8417

Try on and re-pin until you get it just right (so it stays on like a headband without slipping):

100_8418 100_8418

Once, you have it right, add 1" for overlap and cut. Stretch the piece along a measuring tape to get an idea of a comfortable stretch amount. (Her elastic was about 17-19" and it stretched easily to 24".) I used 3/4" elastic (I think!), but whatever you would prefer for a headband will work...ok, not 'whatever', I would go with 1/2" or bigger.

100_8419

Sorry, I got in a hurry and stopped taking pictures for a few minutes!

Cut a piece of fleece this stretched length (24" for me), adding on and inch (ish) for overlap (so, 25"). The piece should be twice the width of your elastic plus 3/4"-1" for seams. (So, 2 x 3/4 = 1.5 + .75 = 2.25 or 2 1/4") This will be the head piece.

With front of cat ears facing fleece, align raw/bottom edges of ears with long raw edge of head piece. Sew 3/8" seam - just where ears are. I have my cat ears touching at the bottom corners.

Open out so that ears are pointing away from head piece (long strip).

Fold long edges of  fleece in 1/4" (press if you like...I just held them in place). Fold piece in half lengthwise, keeping raw edges folded to the inside 1/4". Top stitch along this long side, creating a casing for the elastic. Insert elastic. (Be care to hold on to that first end!)

100_8421 100_8422

Pull two ends of elastic together. Overlap elastic 1/2" or more if you like. and stitch it together well - your kid's going to be stretching it a lot.

100_8424 100_8425

Now, pull the two fleece ends to cover elastic, fold in the raw edge if you want, and center the seam on the flat elastic (rather than having the seam at the edge of the elastic). Sew across elastic to hold in place and close strip. Adjust seam to be along center of elastic (so that ears stick up rather than lie against the head).

100_8426 

Try it on!

100_8428

My daughter has really silky fine hair, so for most, the piece of elastic may not need to be so long. Her headband couldn't be too tight or it would just slip right off her head.

Thanks to the long length (and my not quite as beautifully silky hair), it also fits me! (Sorry for the weird face - I'm not so good with self portraits!)

100_8427

Now we were ready to leave!

Friday, November 7, 2008

Owl Halloween Costume

100_8454 21 Month old as an Owl

Base: Brown Pants, Brown shirt

What I bought:

1/2 yard dark brown fleece

1/2 yard light brown felt (I think I used less, but I'm not sure how much...)

1 sheet yellow-orange felt

white felt

black felt

foam (I used 1/2", but 1/4" would have been nice if it were available) - 1 yard made wings for both owl and penguin costumes. For owl only, see instructions - probably still close to a yard.

a little stuffing

elastic (I used 3/4")

(I also used some velcro for the arm straps. I would recommend elastic, see penguin costume post.)

thread


What I did

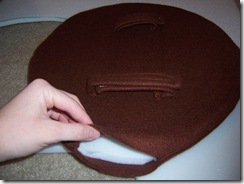
For the "front feathers":

Make a pattern (it's not that hard) - a strip as long as you have paper for, 3" tall.

Using a cup (or other round flat traceable object about 3" in diameter), draw scallops that are 1 1/2" tall. The extra 1 1/2" will be for overlap.

(here's mine scanned)scan0005

100_8274

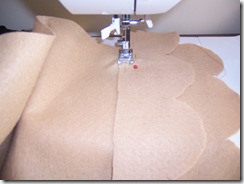
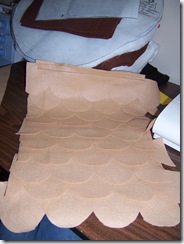
Lay your pattern out on the fabric, pin it down, and cut around it. When you get to the end of the strip, don't cut all the way up the scallop. Move the pattern, lining up the scallops, and continue across the width of the fabric (72" in my case). I used 3 rows, 72" wide. Leave them whole and you can cut them into strips the width you need later.

100_8276 

Cut a piece of the leftover slightly bigger than your child's chest (I chose 10" wide x 14" tall)

Sew the strips straight across, overlapping so the seam of the one you just sewed is slightly above the top peak of each scallop of the current strip (about 1 1/2").

 100_8278 100_8279

100_8280 
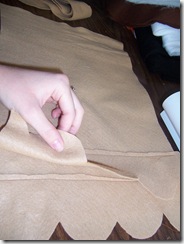
You can now trim straight up the sides or curve them a little, whatever you like. (I cut straight up the sides - quicker, easier)

Put this aside. Let's move on to some wings!

OWL WINGS:

To make the wing shape, I measured shoulder to wrist (top of shoulder, where a t-shirt collar would be). This is the vertical height (add on an inch for seams). For width, choose something that "looks good". My vertical height was 17", so I did 14 or 15" across to make it almost circular. Then, curve the corners from the midpoint of each side to the midpoint of the bottom. (Leave about 5" across the top flat.) I would scan the pattern, but my scanner isn't that big!

100_8271 100_8275

Lay it on the fleece (no need to pin if you use patter paper b/c it won't move). Cut around it. Cut FOUR (4). (If your wing is not completely symmetrical, flip the pattern over for the bottom 2 wing pieces.

Whichever wing piece will be the bottom - sew a strip of elastic about 2/3 the way from the top.

Sew together the wing pieces "right sides together" (with the elastic sandwiched between) with 1/2" seam allowance.

Leave the top (shoulder) of the wing open.

Now, cut two pieces of foam slightly smaller than the wing. If you were perfect with your sewing, just trim off 1/2" all the way around your pattern. (Or just keep stuffing and unstuffing and trimming and restuffing the foam down in until you get it right!) Once you have the foam shape right, stuff into wing, smooth it out, and sew across top (tucking in the raw edges).

100_8357

Sew across the top (shoulder). Repeat for other wing.

100_8358 

Note: on the picture you'll see that I used strips of fleece with velcro sewn on for arm straps, and I put two. I prefer the elastic - it was quicker and stayed on my kid's arm better. Again, see penguin post (later) to see elastic.

Putting the pieces together....

Now, match up the front top corner of a wing with the front top corner of the "front feathers". Sew a few stitches to hold together. Same for other wing. (Make sure the wing is on TOP of the front feathers.)

Hopefully, you can tell from the picture about where I sewed these together. (I didn't really measure or mark; I just picked a spot and sewed.)

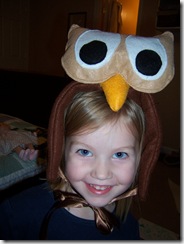
My 21 month old was asleep, so my 3 1/2 year old assisted in the trying on (not too bad considering it wasn't sized for her!)

100_8376

Now, for the back, take another piece of 3/4" elastic (and make sure the kid you're making this for is awake!) Put on the feathers/wings piece (onto the child). Assuming you can get him/her to stand still (try the tv or Dad), safety pin the elastic to the back of each wing (near the top - like the front feathers were attached - just wherever it suits your child best). Replace the safety pins with a few stitches (straight, zig zag, whatever) to secure in place. Using elastic means when you put it on or take it off, it'll stretch and you can get it on/off quickly (like while they're running away from you).


OWL HOOD

OK, for the hood. As a disclaimer, let me say a few things.

1. I got the hood idea from another site. But then, I ignored the instructions (and it came with NO measuring ideas), so I don't feel like I'm copying someone else's idea at all, b/c I basically had to make up the whole thing by myself anyways.

2. If I made it again, I would do it like I did the penguin hood/wings (can you tell this was the first costume and the penguin was last??)  You'll have to read that one to see exactly how I did it, but I basically made the hood/wings attached (like a "hoodie" sweatshirt).

But, for the sake of it, here's how I did it (pictured again is my lovely 3 year old assistant):

I measured from the front (forehead) over the top of the head and down to the neck. Call this "x".

100_8524

Now measure from the front (cheek area) around the back of the head to the other cheek (as far forward as you want the hood to come). Call this "y".

100_8525

Now measure from shoulder to shoulder over the top of the head. Call this "z".

100_8527

Those pictures are just to give you a general idea of the direction I want you to measure. One hand already had the camera though. I suggest an adult actually hold the tape and measure. 

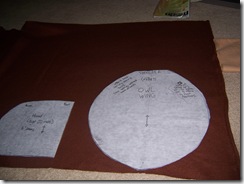
For the hood, I made this shape (the picture looks weird, but I did start with a perfect rectangle):

100_8273

The width of the bottom is 1/2 of y +1" (hope you liked algebra!)

The height of the front is 1/2 of z + 1".

(Make a rectangle and curve the top corner that will be at the crown of the head.) This curved line from top front to bottom back should be a great deal bigger than "x". So, once you make it, you will notice the kid has a lot of "bulk" at the back of the head. You can attempt to alter this pattern before you make it by moving the bottom (1/2 y + 1) towards the right (front) and making the "x" curve more curvy or something. I suggest going to Hancocks during one of their 99 cents pattern sales and getting a hoodie pattern and copying the hood part. But if that's not a choice, this will do.  I just did this, so my little owl had a 'big head' for the night.

Sew the curved edge of each pair of two pieces to form the hood (right sides together) and lining (right sides together). You can be fancy by putting in batting (which I did and wished I didn't) or foam (suggested to me - like your kid needs THAT much stiffness added to it!) or you can leave it plain.

Align the hood and hood lining right sides together (seams on the outside). Sew along the front and continue along bottom, leaving a hole somewhere for turning. Flip it right side out and sew up this hole however you like. (I don't usually slipstitch b/c I'm lazy, so I just top stitched around the entire thing.)

If you like: Leave about an inch opening along the bottom of the hood at the front edges. After it's been flipped, topstitch along the front edge about 1/2" - 1" from the edge to create a casing. (String something through it.)

(You can also make this unlined. See penguin hood instructions.) To make it fancier, and more complicated, I have the instructions I started with and then ignored, which includes a casing, velcro closure on the front, and an overall nicer finish. I would give the link, but it's dead now, so all I have is the printed page that I copied to Microsoft Word. email me if you want it (cebailey64@hotmail.com).

Owl Face:

owl face Copy and paste this into a program (word, publisher, whatever you like). Print it out so that the face is about 7" wide by 5 1/2" high.

100_8283  100_8285 100_8286 100_8287 100_8288 100_8289    

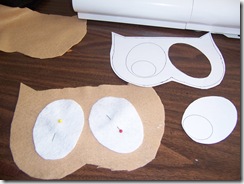
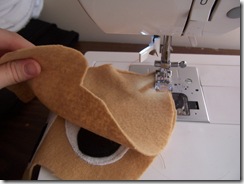
To make the cute little owl face, cut two face pieces from light brown felt using the pattern in this blog. Cut two ovals for the whites of the eyes and two circles for the pupils. Sew the white ovals onto the face front. Sew the black circles onto the face front, aligning them onto the white ovals. With face side against other felt face piece, stitch around the face, leaving an opening for turning. Turn. Stuff with fiber fill. Slipstitch opening (or if you're lazy too, just topstitch around the whole thing!)

Stitch the owl face to the top of the hood (just make a few stitches across the back of the owl face through the top of the hood). Shake the hood or put it on your kid and tell 'em to run around to see if the face jiggles too much.

scan0006

Make the beak by cutting out pieces of yellow-orange felt using pattern above (for size, bottom of beak side should be about 2.5"). (for beak, use 1/4" seams) Sew the two top beak pieces together along the top. Sew the bottom beak piece to the top beak piece along the edges. Clip front tip of beak past seam to minimize bulk. (The back is left open.) Stuff with fiberfill.

100_8360Sew the edges of the beak to the face where the curve is between the eyes. (I ended up pulling out that annoying clear nylon thread so that my pathetic stitching didn't show.)

100_8361100_8372

If you didn't make a casing in the hood, sew some ribbon, string (or something!) to the front bottom corners of the hood - tie it on. (And when the baby wakes up, try it on her - it is HER costume afterall.)

100_8374

Well that first real post was a lot longer than I expected! Hope that helped in some way.

Upcoming posts to look for: penguin, bat, cat ears, quick treat bags.