Tuesday, February 26, 2013

Family Home Evening Chart Ideas


Our first:
The first FHE chart we had I started at a relief society activity - I was really excited to make it since it reminded me so much of the one my family used growing up.

I didn't actually finish the chart that night, but I had taken 6 "heads" (although I only had 1 child at the time...I may have even been pregnant with him?) and I finished it at home later...my own way.

I decided I wanted the heads to stay put so we could be in order and I didn't actually get around to finishing the chart until I had 2 kids, so the bottom two circles were just painted and left blank until the twins were born a few years later.

I bought the little wooden pictures from Michaels to represent the different things we wanted as part of our FHE - I tried different things at different times, so I stuck the extras onto the back with more velcro so we could edit our 'agenda' from time to time. (The family's hair is made using embroidery floss I had in my stash.)

Our various parts (we used only 6 of these at a time):
  • Welcome (obviously, "welcome")
  • Prayer (opening or closing, sheep)
  • Song (I had a note at some point?)
  • Activity song (hand)
  • Lesson (book)
  • Activity (behive or pencil)
  • Treat (cupcake)
  • Talent (star)
  • Article of Faith (bee-leaf...get it? belief.)

Our current:
Then, we had another kid, and I wanted a new chart...so I finally got around to making one. "Just in case" (and to accommodate guests for FHE), I added an extra spot on this chart for a total of 8. We leave the "?" at prayer until we have a guest over. We used to rotate ? and whoever had the welcome could do both or I came up with that part (?) for FHE.


I (machine) embroidered these designs onto fabric, then sewed on 8 clear vinyl pockets (the vinyl squares have brown satiny ribbon folded over the cut edges before being sewn onto the fabric) - I didn't put a lot of forethought into placement since I was new to embroidery, so the pocket placement isn't perfectly even, but (surprisingly) this doesn't bother me.

Blank, it looked like this:

When I added the letter circles, the bottom bunched a little from the weight, 
So I added another dowel in the bottom (I didn't want to undo my side seams to make a casing between the layers, so I just folded the bottom up around the dowel and stitched it in place then re-inserted the dowel.)


To  make the circles, I saved the lids from 8 can of (del monte) spaghetti sauce and covered them with fabric that had been embroidered with the initial of a family member. I used hot glue and I glued a circle onto the back to cover the edges of the front circle. They have held up nicely. 
My only regret is the font I used...the kids had to get used to the way their letters looked.

This time I  made the placement of activities fixed (so the "welcome person" - conducting person - knows where to start and end) - and the family rotates around.

Our current agenda:
  • Welcome
  • Opening Song
  • Opening Prayer
  • Lesson
  • Activity (movement) song
  • Article of Faith (which we also sing - all together)
  • Fine Arts/Talent
  • Closing Prayer

We move straight down the middle - the initial circles alternate sides of that middle agenda.

We decided treats weren't necessary to FHE - if we want a treat, we'll call it dessert and eat it when we eat dinner - it made the bedtime routine flow smoother.

And in a few years when the kids get older and we don't need a wiggle song or they all know all the articles of faith, I'll probably edit it again and make a new one. :)


Tuesday, February 12, 2013

2013 - Valentines - Hang Around - Clothespin

Another year of "what can I do that's cheap for valentines but that's something they can have?"...and doesn't involve candy (per our district's "no candy" policy)....I'm posting early this week in case you need a valentine project to throw together before Thursday!

 I've got 5 kids, that's 20+16+18+19+3 = 76 valentines to buy or make! and I don't like to give just a little card from some pre-made pack of character valentines from the store. (I know, I complicate my own life.) :)

Found an idea for various clothespin crafts, so I took a spun on those for our own valentine. 
Here it is all wrapped up:

We painted clothespins (right now they have a 36 pack at the dollar tree - most of mine came from a 100 pack from walmart for some low cost). And let them dry overnight.

For my 3 year old's preschool group (there are only 4 kids, including her), I printed out little hearts with the other kids' names on them - onto pink cardstock. When the "big kids" get home from school today I'll probably have them handwrite names into the hearts.


To "laminate" them, fold a piece of clear packaging tape over the heart and then trim around (leaving about 1/8" border of clear tape to protect the heart). I glued them on with hot glue (that part I will do for all the kids...except my 8 year old daughter who will probably insist she can do it without getting burned)...


Add a magnet piece on the back (this one's cut a little big) - it doesn't take much.
(and I have a big roll since the dollar packs of magnetic adhesive strips were out of stock)...
more projects for later. :)


Ta-da! A cute valentine that the kids can use to "hang" artwork onto any magnetic surface - like the fridge.

Cost to me:
2 pkgs bags: $2
clothespins: $1
 (I only needed about 20 more - so 1 dollar tree pack...I had about 50-something in my craft drawers leftover, but this would have been about $2.50-$3 for the 100 pack from walmart...I think?)
paint: 79 cents
cardstock: in stash (free)
I already have lots of this - (but you can get a pack of 50 sheets for a couple dollars)
packaging tape: in stash (free)
again, we already have several rolls of this (last time we needed it, I could only find the multi-roll packs)
magnetic tape: $3.50 - which I'll probably use only a 1/5 of - the roll is huge and wide
(so 70 cents for this project, we'll say)
paper/ink: got it (free)

So total I spent this year, right now: less than $5 for 76 valentines that are cute.

(Yeah, I know - I'm kind of cheating on the cost - counting "free" stuff I have that was bought/paid for in the past, but counting only the portion I am using for things I had to buy a whole pack of right now...still less than $8 if I "charge the entire roll of magnetic tape to this account" :) and yes, it would have cost even more had I had none of these...but then I'd have done a different project.) :)

I just found a heart online so I didn't have to draw one over and over and I put it on a page a bunch of times to print out...for your convenience, you can use the one I put together:
jpg file:

or pdf:

for the message I typed up and "fonted" cute...you can print 4 to a page, 6 to a page, or 9 to a page, depending on the size you want the message to be. (I like the 9/page best - for space and for size):
3x3

or the word docx in case you want to edit it like you like it:
Message - word doc

Thursday, February 7, 2013

Toy Weapons + sewing mom

Artillery Belt, holsters, etc...


Yeah, I know it's labelled as a boy toy, but you know the girls play with his weapons too. (And this one was made for the twins' friend - a boy turning 6 years old.)

 All of our nerf swords were killed by the bark of pine trees...so sais now take their place.

 Adjustable back over shoulder strap.

 The true house-ninja

 Can't believe it still fits him 2 years later - non-adjustable artillery belt.

still, sais in the sword pocket.

Here's the sword (2 years ago when it was in existence)

This project needed to be broken down in several posts. It's not hard, but it took a lot of different pieces, so I decided to split those into individual posts. All post together today, but links will be added between posts so that they all are connected.

dart gun holster pattern (in case my pattern doesn't fit your gun)
sword holster

The old post
(made end 2011 that wasn't so much of a tutorial as general instructions - including two holster patterns)

Pattern: Dart Gun Holster

MAKING THE PATTERN
This is a post to aid in the dart gun holster - I made instructions on how to make one and posted my patterns, but in case they don't fit and you need to make your own - here's how I did it.


I tried 2 versions this time around, one where I crinkled the paper around the gun and made pin holes to mark where it met itself so make a more contoured holster. Not worth the aggravation to make/use.

Then, after making the pattern I decided I wanted it less contoured - it would fit changing guns and I thought the gun would slip in/out more easily, so this tutorial is more mathematical and less paper bending. :)

Disclaimer - this is not officially how you make a pattern for this or anything else...this is more of me letting you in my sewing area to watch me make a pattern...and fix it.

DIRECTIONS:
Get a big sheet of paper - I used a roll of my kids' easel paper. (tissue paper, opened up large brown paper sack, taped together computer paper, whatever you have around the house...I've used all of those for patterns.)


Place the gun about 3" from the short edge and about 1" from the long edge. (Give some space beyond the gun and you can cut off the excess.)
{In hindsight, I would go about 8" from the short edge to leave room for the belt loop/casing}

Mark where top of gun is. Draw a straight line across (move the gun first). We'll call this "line A" for the rest of the pattern.

 Measure width of gun (from top)
Mine's 3"

Measure 3" up from first line (at top of gun) - draw another line. (This will be line B.)
Measure from the bottom of paper to line A. (Mine was about 6.5")

Above line B - draw another line (parallel to line B) the distance away that you just measured (for me, 6.5")
Your pattern should look a little more symmetrical.

 (You don't really have to do this step b/c you're going to fold it in half to do the cutting, but you just need to make sure you have that much space before you cut and realize you're short. If you are short...now's the time to tape some paper together!)

Make sure the dart gun is back in place.
Then draw an outline around the dart gun (it doesn't have to be perfect...just where the holster would ideally be.) You can keep it close - you've got the 3" margin for the thickness above the gun accounted for already.

 Draw another curved line to match this one 1/2" away - this is a seam allowance.
Also, draw a midline (between line A and line B) - so that the 3" margin for the gun's thickness gets split in two. (This is so you can tell where to fold it in half.)

 Fold it in half and cut along that outer curved line.


Lay the gun back on top of your partially-made pattern and mark where the trigger spot is...this is about where you want the bottom of your opening so that you can 'grab and go' when that stuffed animal wolf sneaks up behind you.
{In hindsight, I probably would have made this a little higher...just so the gun was a little more protected.}


Curve this line into an arc, ending at line A.


In case I used this pattern for an unlined holster, I traced the curve to the other half to cut out there, but you could keep it where it is and just flip the pattern over...or if it's always lined, it doesn't matter b/c you'll have two identical mirror image pieces of fabric.

Cut along this curve through to the top of the paper.
{In hindsight - continue that cut all the way through to the top...I just didn't rephotograph after I realized I needed to keep cutting.)

Your pattern is mostly done...we just need to add something for the belt to go through.
{Another hindsight comment, yes...I didn't leave enough space at the side of my paper where the top of the holster pattern is, so I had to add some.}

I wanted it to hang at a slight angle (last time I didn't - my mavarick gun pattern hangs down straight).
The math-y part of this, you'll need a ruler like this one for. If you don't care so much about what angle you're making, just use any ruler.

If math doesn't scare you, stick with me...
Lay the grid ruler on top of the line...hm, we didn't name this one - it's the line that is perpendicular to line A and line B - it was on the right side of the paper, but is now the top of the holster pattern. We'll call it C from now on.
Center the 30 degree line of the ruler over line C. (There is a 30 degree line on either side of the center of the ruler, so make sure the ruler is aimed like this one so that your holster will hang right.)


Draw another line a few inches over, parallel to the first. (You can use any rectangular object that is the width you want your casing at the top of the holster to be - align it with the first line you drew, then trace along the opposite side of your object - you'll have 2 parallel lines spaced like you want them.)
Here is a full shot so you can see the direction of the lines.
 Don't cut anything yet.

 I had to tape some more paper to the back of mine behind the sets of lines I just drew to extend the length.
To make it easier, I went ahead and decided the size of my casing (at least 1" for the belt) - 1 1/2", then added a seam allowance (1/2").
Since it's folded in half, that number should double - to 4".
I cut out a piece of paper the size I wanted in width by the 4" I needed in height, and then folded it in half (where it would fold once I sewed the holster). I taped it on the back to align with where I wanted the "top" of my holster to be.


 Then, I turned it over and cut off the excess from the original pattern.
I also folded over the casing and cut it in a more contoured shape (notice the curve on the right of the fold over belt casing.)


One other edit I had to make later as I was sewing...
I found those little curve around the trigger spots were impossible to sew around easily and flip and etc...so just cut them off. It's all better. Trust me. (and ignore that stain on my carpet that is twice as dark in this picture as in real life...should have photoshopped that out)

That's how I did it. Good luck making yours.

I'll post my scanned/photographed and sized to print pattern as a link on the holster instructions page.


Dart Gun Holster

This is part of a collection of posts to make an artillery belt/gun-sword holsters for a boy's toy.
You can use any belt you have around the house for the dart gun holster, or you can go to the artillery belt post if you want to make it yourself.

The first time I made this (for the nerf Maverick) I used outdoor canvas, which I much preferred.


This time (making for the BuzzBee Rogue), I use some (still tough, but not as stiff) duck cloth. I chose to fuse (with fusible webbing "wonder under") some heavyweight stabilizer. You could also use fusible stabilizer or just not worry about it. (I'm just trying to diminish my stash of randomness.)


If you have a Nerf Maverick, use pattern 1.
(top left, top right, bottom left, bottom right) - piece them using the vertical/horizontal lines)
This one is a little less sleek in its design - more boxy - I might improve it later. It should look like this once the pieces are taped together:

(note - this pattern from my 2011 version uses buttonholes to attach holster to belt - if you wish fold-over style attachment for easier sewing, just extend the top another few inches) Other than that, the overall construction of this version is easier. Instructions here. 

If you have a Buzzbee Toys Air Warrior ROGUE (Target), use pattern 2.
(top left, top right, bottom left, bottom right) - piece them the same way to look like this:


For either of these, skip down to Putting it Together.

If you have something else, you'll need to make a pattern first - try this post.
Note before making pattern:
(You could just pick a pattern, print it and wrap it around and see if your gun fits...save yourself the trouble of pattern making)


Instructions for the lined 2013 version 

(more seamless but a little more tricky than 2011's lined version)
 (*for a quick and easy unlined option - see end of post)


Using your pattern as a guide, cut out 2 layers of fabric.

If you need to stabilize the fabric, start with heavyweight stabilizer (I assume it's not fusible...if it is, skip down to step 3.)
1. Lay fusible webbing shiny side down on top of heavyweight stabilizer.
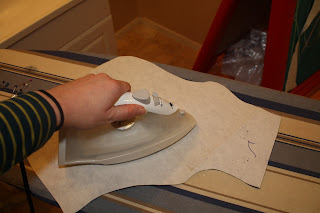
2. With iron on low to medium and no steam, iron slowly over entire area to be fused. (Fully fused when fabric is cooled. If you fused any to your ironing board, pull it up while it's warm)


 3. Lay fabric (already cut from pattern piece - or pattern piece itself - fabric just stays put better without pins) on top of (now) fusible stabilizer - fusible side of stabilizer up, wrong side of fabric down.

4. (Assuming you used stabilizer and webbing) Peel paper backing from fusible webbing (it should be cooled).

5. Align stabilizer over the wrong side of the fabric (with exposed fusible material facing the fabric - fusible facing down). 
I flipped these over and put the fabric on the bottom because I always prefer the fusible material to be against my ironing board rather than (potentially) against my iron. Ideally, I would lay some junk fabric or old towel under the project so that the fusible junk gets on that, but my ironing board cover is so far gone that I didn't care if it got fusible stuff on it.

6. Iron (again, low to medium heat and no steam) to fuse. Once it's cool - you're good to go.

Your dart gun holster - outer fabric.
(You should also have another fabric - not stabilized just like this but mirror image)


Now, you're ready to start sewing!

1. Fold holster, aligning bottom curves, and sew along bottom/side curve.


2. Clip curves and snip off corner.

3. Repeat for lining - but be sure it's mirror image of the outer (unless your fabric has no right/wrong side - then it doesn't really matter).


4. Flip the lining so that its seams are inside, then slip it into the outer fabric of the holster. Align all edges and seams and pin in place.

5. Seam around the edges, leaving an opening at the top (straight edge) of the holster.
(see that little notch on the right with the white pin in it? - that got trimmed later - it was just too much to work with when I flipped it and tried to get it to cooperate - no amount of trimming/clipping that curve helped.) This is noted on the pattern.

Be sure sew in a little at each end of this opening/side so that the corners form well.

6. Before you flip (you know it's coming next), trim the edges, clip your corners, and clip little triangles or straight lines around all curves. If you neglect this step, your curves and corners will look 'wonky'.

Now, you can flip it right side out.
Poke a pencil or something in your corners to get them crisp and smooth out the curves, etc. Iron to crease and tuck in that open edge so it looks closed. Iron well (so it stays while you stitch it shut).

Starting at the opening (to close it), top stitch all the way around the holster.


The last thing to do to make it useable is to make it attachable to a belt.

Put it on a Belt - make a "casing" to put the belt through.
(Hint: This is the easier version than 2 years ago with buttonholes!)

1. Fold over the top portion of the holster to the back so that it lines up well. Make sure you have a 'casing' (hole/gap/etc) big enough to accomodate the belt.

2. Stitch along the bottom - backstitch at each end well.


If this is overwhelming to you or if you have fabric that you don't want to line - try this instead:


For a quick and easy unlined holster - 
Using double fold bias tape, fold tape over edges of holster - covering all areas that will not be touching when folded. Stitch through bias tape and holster (sandwiched inside folds of tape).

Fold holster for finished look. Stitch along bottom and side to create the holster pocket where gun will go (just as in step 1 at the top).

Using more double fold bias tape, open fold of bias tape and roll end and seam (1/4").
Re-fold this bias tape and starting at bottom of holster (the seam you just made to shut it), fold this piece over seamed edge of holster from bottom to top of seam.

When you are nearing the end, stop, remove from machine, and cut the bias tape (leaving an extra 1/2"). Open the bias tape, and hem this end, folding 1/4" then again 1/4".

Refold bias tape over the rest of the holster seam, and continue stitching through tape/holster, covering the rest of the holster's raw edges.

If your holster has the foldover style (the one shown here is buttonhole style) to attach it to the belt, then fold over the top toward the back (leaving enough room for a belt to go through) and stitch in place.

It will look similar to this smaller version made for a mini dart gun:

The pattern for this one is here:

to print to 8.5 x 11 sheet of paper, use this one: