 21 Month old as an Owl
Base: Brown Pants, Brown shirt
What I bought:
1/2 yard dark brown fleece
1/2 yard light brown felt (I think I used less, but I'm not sure how much...)
1 sheet yellow-orange felt
white felt
black felt
foam (I used 1/2", but 1/4" would have been nice if it were available) - 1 yard made wings for both owl and penguin costumes. For owl only, see instructions - probably still close to a yard.
a little stuffing
elastic (I used 3/4")
(I also used some velcro for the arm straps. I would recommend elastic, see penguin costume post.)
thread
What I did
For the "front feathers":
Make a pattern (it's not that hard) - a strip as long as you have paper for, 3" tall.
Using a cup (or other round flat traceable object about 3" in diameter), draw scallops that are 1 1/2" tall. The extra 1 1/2" will be for overlap.
(here's mine scanned)

Lay your pattern out on the fabric, pin it down, and cut around it. When you get to the end of the strip, don't cut all the way up the scallop. Move the pattern, lining up the scallops, and continue across the width of the fabric (72" in my case). I used 3 rows, 72" wide. Leave them whole and you can cut them into strips the width you need later.

Cut a piece of the leftover slightly bigger than your child's chest (I chose 10" wide x 14" tall)
Sew the strips straight across, overlapping so the seam of the one you just sewed is slightly above the top peak of each scallop of the current strip (about 1 1/2").
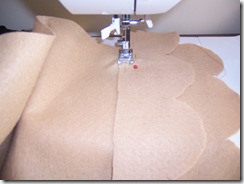
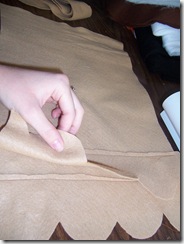
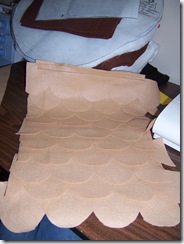 You can now trim straight up the sides or curve them a little, whatever you like. (I cut straight up the sides - quicker, easier)
Put this aside. Let's move on to some wings!
OWL WINGS:
To make the wing shape, I measured shoulder to wrist (top of shoulder, where a t-shirt collar would be). This is the vertical height (add on an inch for seams). For width, choose something that "looks good". My vertical height was 17", so I did 14 or 15" across to make it almost circular. Then, curve the corners from the midpoint of each side to the midpoint of the bottom. (Leave about 5" across the top flat.) I would scan the pattern, but my scanner isn't that big!

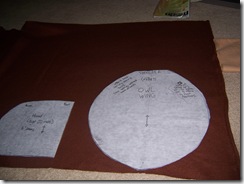
Lay it on the fleece (no need to pin if you use patter paper b/c it won't move). Cut around it. Cut FOUR (4). (If your wing is not completely symmetrical, flip the pattern over for the bottom 2 wing pieces.
Whichever wing piece will be the bottom - sew a strip of elastic about 2/3 the way from the top.
Sew together the wing pieces "right sides together" (with the elastic sandwiched between) with 1/2" seam allowance.
Leave the top (shoulder) of the wing open.
Now, cut two pieces of foam slightly smaller than the wing. If you were perfect with your sewing, just trim off 1/2" all the way around your pattern. (Or just keep stuffing and unstuffing and trimming and restuffing the foam down in until you get it right!) Once you have the foam shape right, stuff into wing, smooth it out, and sew across top (tucking in the raw edges).
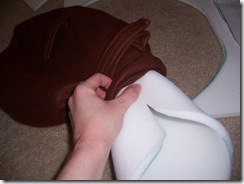
Sew across the top (shoulder). Repeat for other wing.
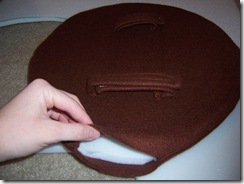
Note: on the picture you'll see that I used strips of fleece with velcro sewn on for arm straps, and I put two. I prefer the elastic - it was quicker and stayed on my kid's arm better. Again, see penguin post (later) to see elastic.
Putting the pieces together....
Now, match up the front top corner of a wing with the front top corner of the "front feathers". Sew a few stitches to hold together. Same for other wing. (Make sure the wing is on TOP of the front feathers.)
Hopefully, you can tell from the picture about where I sewed these together. (I didn't really measure or mark; I just picked a spot and sewed.)
My 21 month old was asleep, so my 3 1/2 year old assisted in the trying on (not too bad considering it wasn't sized for her!)

Now, for the back, take another piece of 3/4" elastic (and make sure the kid you're making this for is awake!) Put on the feathers/wings piece (onto the child). Assuming you can get him/her to stand still (try the tv or Dad), safety pin the elastic to the back of each wing (near the top - like the front feathers were attached - just wherever it suits your child best). Replace the safety pins with a few stitches (straight, zig zag, whatever) to secure in place. Using elastic means when you put it on or take it off, it'll stretch and you can get it on/off quickly (like while they're running away from you).
OWL HOOD
OK, for the hood. As a disclaimer, let me say a few things.
1. I got the hood idea from another site. But then, I ignored the instructions (and it came with NO measuring ideas), so I don't feel like I'm copying someone else's idea at all, b/c I basically had to make up the whole thing by myself anyways.
2. If I made it again, I would do it like I did the penguin hood/wings (can you tell this was the first costume and the penguin was last??) You'll have to read that one to see exactly how I did it, but I basically made the hood/wings attached (like a "hoodie" sweatshirt).
But, for the sake of it, here's how I did it (pictured again is my lovely 3 year old assistant):
I measured from the front (forehead) over the top of the head and down to the neck. Call this "x".

Now measure from the front (cheek area) around the back of the head to the other cheek (as far forward as you want the hood to come). Call this "y".

Now measure from shoulder to shoulder over the top of the head. Call this "z".

Those pictures are just to give you a general idea of the direction I want you to measure. One hand already had the camera though. I suggest an adult actually hold the tape and measure.
For the hood, I made this shape (the picture looks weird, but I did start with a perfect rectangle):
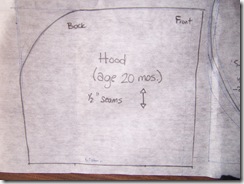
The width of the bottom is 1/2 of y +1" (hope you liked algebra!)
The height of the front is 1/2 of z + 1".
(Make a rectangle and curve the top corner that will be at the crown of the head.) This curved line from top front to bottom back should be a great deal bigger than "x". So, once you make it, you will notice the kid has a lot of "bulk" at the back of the head. You can attempt to alter this pattern before you make it by moving the bottom (1/2 y + 1) towards the right (front) and making the "x" curve more curvy or something. I suggest going to Hancocks during one of their 99 cents pattern sales and getting a hoodie pattern and copying the hood part. But if that's not a choice, this will do. I just did this, so my little owl had a 'big head' for the night.
Sew the curved edge of each pair of two pieces to form the hood (right sides together) and lining (right sides together). You can be fancy by putting in batting (which I did and wished I didn't) or foam (suggested to me - like your kid needs THAT much stiffness added to it!) or you can leave it plain.
Align the hood and hood lining right sides together (seams on the outside). Sew along the front and continue along bottom, leaving a hole somewhere for turning. Flip it right side out and sew up this hole however you like. (I don't usually slipstitch b/c I'm lazy, so I just top stitched around the entire thing.)
If you like: Leave about an inch opening along the bottom of the hood at the front edges. After it's been flipped, topstitch along the front edge about 1/2" - 1" from the edge to create a casing. (String something through it.)
(You can also make this unlined. See penguin hood instructions.) To make it fancier, and more complicated, I have the instructions I started with and then ignored, which includes a casing, velcro closure on the front, and an overall nicer finish. I would give the link, but it's dead now, so all I have is the printed page that I copied to Microsoft Word. email me if you want it (cebailey64@hotmail.com).
Owl Face:
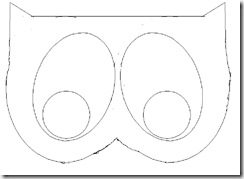 Copy and paste this into a program (word, publisher, whatever you like). Print it out so that the face is about 7" wide by 5 1/2" high.
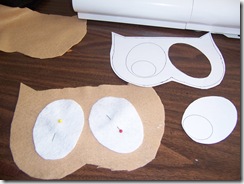


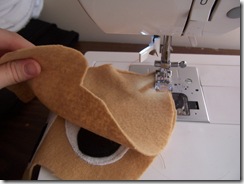

To make the cute little owl face, cut two face pieces from light brown felt using the pattern in this blog. Cut two ovals for the whites of the eyes and two circles for the pupils. Sew the white ovals onto the face front. Sew the black circles onto the face front, aligning them onto the white ovals. With face side against other felt face piece, stitch around the face, leaving an opening for turning. Turn. Stuff with fiber fill. Slipstitch opening (or if you're lazy too, just topstitch around the whole thing!)
Stitch the owl face to the top of the hood (just make a few stitches across the back of the owl face through the top of the hood). Shake the hood or put it on your kid and tell 'em to run around to see if the face jiggles too much.

Make the beak by cutting out pieces of yellow-orange felt using pattern above (for size, bottom of beak side should be about 2.5"). (for beak, use 1/4" seams) Sew the two top beak pieces together along the top. Sew the bottom beak piece to the top beak piece along the edges. Clip front tip of beak past seam to minimize bulk. (The back is left open.) Stuff with fiberfill.
 Sew the edges of the beak to the face where the curve is between the eyes. (I ended up pulling out that annoying clear nylon thread so that my pathetic stitching didn't show.)
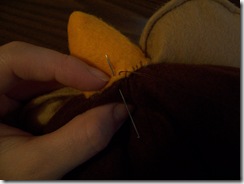

If you didn't make a casing in the hood, sew some ribbon, string (or something!) to the front bottom corners of the hood - tie it on. (And when the baby wakes up, try it on her - it is HER costume afterall.)
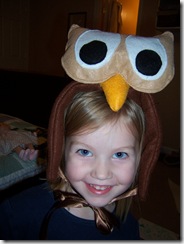
Well that first real post was a lot longer than I expected! Hope that helped in some way.
Upcoming posts to look for: penguin, bat, cat ears, quick treat bags.


