Showing posts with label headband. Show all posts

Tuesday, October 29, 2013

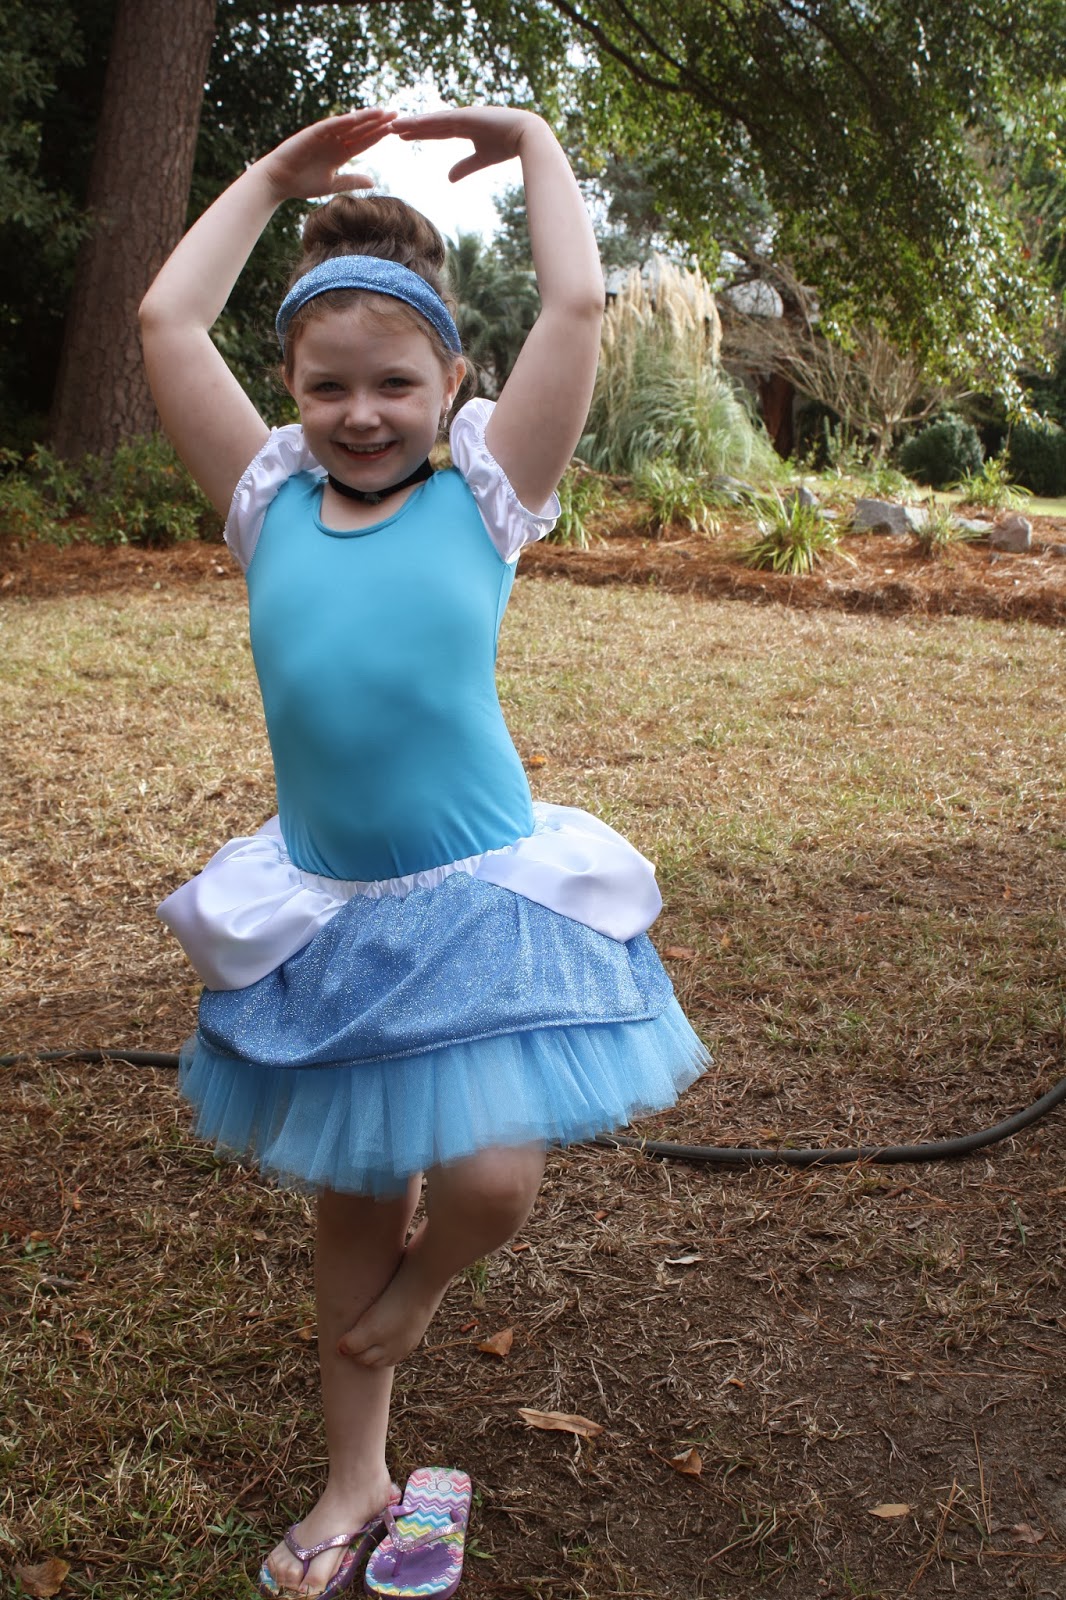
Halloween Costumes 2013: Cinderella as a Ballerina

When she said she wanted cinderella as a ballerina, she was actually looking at one of the tacky adult costumes that try to be "flirty" in a pattern book at JoAnn fabrics. (I was grateful that ballerina was how she perceived what that costume was!)

My second thought was, uh, can't you just wear the cinderella dress I made two years ago and stuff a tutu under it? I like to sew, but I like some variety. But I let her describe what she wanted, then designed my plan from there.

I wanted to try out making a leotard (since my girls need new ones and making leotards and swimsuits has interested me for years). And a tutu that is removable means that she's more likely to play dress up with it later even if she doesn't want to strip down enough to put on the leotard.

I used Kwik Sew 4011 and altered the pattern to be medium at the top, large at the bottom, and added an inch to the crotch length. (It was relatively easy to alter - one alteration led to the other naturally in tracing it.) Great pattern by the way. (If you have a leotard or one piece swimsuit, you could try tracing the front and back and adding a seam allowance. I wanted the pattern for other things so it was worth the cost of a kwik sew pattern.)

For the sleeves, I drew roughly the same shape of sleeve, but much larger (since I was using white costume satin and not a stretch fabric). I then gathered the sleeve top to fit into the arm opening and added elastic in the bottom to make it fit her arm and puff a bit. (Sleeve pattern below or in pdf and other half)

(that says right half but it should say left half on the pattern piece)

\
Print so the square is 1" and both sleeve halves match in size. Tape together.

For the tutu, I used this tutorial - really the best I've seen for a sewn tutu. (I'm not a huge fan of the knotted mess of tulle strips - unless of  course you don't sew - then I think they're a great alternative.) I used that tutorial for all  tutus.

I used 3/4" elastic, so I had to sew my waistband a little smaller, but other than that the only alterations were in adding my layers of white satin and this cool blue shimmery stuff I got for 69 cents a yard off the clearance table last week at Hancock Fabrics.

I sewed the gathered tulle to one side of waist band, but before sewing the 2nd strip of tulle to the other side of the waist band as the tutorial instructs, I made the white and blue layers of the tutu to add between the tulle and waist band so once flipped, they would be on top of all the tulle.


For the white "waist gathers" I call them, I cut 18" diameter circles, folded in half (wrong sides together) and basted around the raw edges. Then I gathered the edges I just basted together so that it was more of a straight line. I sewed this along the sides of the waist band.) I centered them 1/4 of the way from each end of the waist band. I sewed with the waist band up and the white satin on the bottom so that I could follow the stitching line referred to in the tutu tutorial above.

For the blue shimmery layer, I couldn't decide between a circle skirt style and a straight gathered skirt style, but eventually I decided it would be easier to go with option B. (I kind of wish I'd gone with option A)

I cut 2 strips and sewed them together to be at least as long as the waistband and 10" high (so that the tulle of the skirt would stick out).  I sewed this piece of fabric facing towards the white waist gathers, again, with this on the bottom and the waist band on top (as I did with the white) so that I could see my stitching line on the waist band and follow along it.

______________________________________________________________
{Had I chosen the first option of a circle skirt for the blue shimmery fabric, I planned to cut a circle skirt so the inner circle "waist" would be 53" so that it would fit to the waist band, and then when gathered would be full but flat above the tulle skirt. I planned to cut the circle through - like slicing into one side of a donut - so that I didn't have to worry about the fact that the waistband wasn't a circle until the last step.}

If you're interested in doing this version, I calculated to get a 52 or 53" inner circle and 10" long skirt before hem. 
First, Google a circle skirt tutorial. There are tons of good ones. Then... when you fold the fabric in quarters, your first measurement should be about 8.4" (round up is fine - just cut off what's leftover at the end of the waistband). The second measurement is another 10" away from the first. Hem the outermost circle. "Slice" the donut at one side straight through to center (but not all the way across donut). Then sew to waist band right side toward white waist gathers.

I kind of wish I had done this, but I do like the way my straight gathered skirt for the blue shimmery sort of pushes the tulle down a little. 
_______________________________________________________________________
After that I finished the tutu tutorial as per instructions.

....

For the headband, I used leftover blue shimmery and just folded a rectangle (narrower towards the ends)  so the raw edges were towards the underside  and topstitched along the two long folded sides, and sewed a piece of black 3/8" elastic into each end to wrap around the back of the head. (Little effort was made into making this perfect and it looks just great.) It was about 8" wide towards the middle and 2" wide towards the end - then folded. (Should have cut two pieces and seamed at edges to make it lie flat...oh well.) :) I was in a hurry by this point.

...

For the choker, I just sewed velcro onto the ends of a piece of black velvety trim (from the ribbon/trim section of JoAnn's) and sewed on a little blue crystal-y thing from who knows what that she found around the house.

And that's it. We'll add white tights and ballet shoes when we're ready to trick or treat!

See tinkerbell beside her in the above picture? I'll get to that costume next....

Halloween Costumes 2013: Iron Maiden

Every year I get excited for Halloween. (I know a good many people in my family don't like it.) But it's not the famous parts of halloween that I like - I can't stand the scary, gory, nasty, buggy, creepy stuff! Yuk - if that's all that was involved, I'd hate it. What I like is the fun sewing that ends in playing dressup for candy!

I have a project list longer than my table, but when fall comes, everything on the list gets pushed aside - it's the one time of year that my kids run my projects. And the fact that they are just as excited over my projects (for once) as I am to show it off...ah - reward enough. :)

On to the 2nd costume I'll blog this year -
Iron Maiden! 
(She was inspired by someone on Pinterest while searching with me for ideas.

I thought this would be the hardest, knowing that I did NOT want to try and make on iron man outfit, nor did I want to buy a $15-$20 cheap walmart costume...I lucked out - I found an iron man costume at a local kids consignment shop for $4.50. I can do that.

So I used this tutu tutorial to make a sewn tutu, and then made a headband to give the feeling of the head thing without having to have a mask (creepy and not allowed at our church trunk or treat).

I followed the tutorial exactly except for using 3/4" elastic because that's what I have a bunch of.

I alternated red and gold tulle (inspired by this from Pinterest), but sewn rather than the knotted no sew version.

I suggested a simple eye mask like this one, but she said no thanks. She's my sensitive child (in every way) and the thought of something around her eyes was completely unappealing to her.


For the headband, I cut out a rectangle from the gold felt sheet and laid it over the red felt sheet, sewing the two together along the shape of the cut out. Then, I cut the entire piece to be 5" wide (front to back) - the width across the head is the full width of the felt piece - 9" I think.

I zig zagged over some 1/4" elastic along the front and back of the headband so that it would curve towards her head, and I sewed a piece of 3/4" elastic into each end to fit around the back of the head. (I used her little sister's head for reference since she was not at school like our Iron Maiden was.)

The headband doesn't look awesome, but I doubt anything other than the tutu will be worn over and over again as dress up, so I didn't feel the need to put a lot of effort into it. :)

As you can probably see from the above picture, my other 6 year old girl wanted to be - yes, very specific:  Cinderella as a Ballerina ... That will be my next post - coming soon!

Sunday, November 16, 2008

Cat Ears

Since Carolyn's birthday is tomorrow, I'll post cat ears next.

We had some we got at Target with the tail (pictured) two years ago, but when it was time to pack up and leave to go out of town, she couldn't find them. She said they were broken and she'd thrown them away. I said, I took them out of the trash and I was going to fix them. She insisted she tossed them. (We found them later...it just needs one of those hard headbands replacing the broken one.) But, for the time, I needed cat ears, and something non-breakable!

So, in the 30 minutes I had left, I had the 'opportunity' to sew Cat ears from leftover fleece scraps (from the penguin costume). So, this was a hurried project and is less than perfect...and I made it up as I went (unusual for me!) I would make the ears smaller next time...

The Cat Costume:

100_8458

Black clothes, bought tail (although those are easy to make too) and  face paint if you're into that (we're not). She did not wear those bedroom shoes out the door, although I did make them  - last year, I think? That would be another post...if I feel like it and can remember what I did?

Cut 4 triangles of black fleece (or felt) and 2 triangles of white fleece (felt).

100_8406

I cut them the same, then trimmed down the white.

100_8408


Sew the white triangles onto 2 black triangles (topstitch).The bottom was about 6 inches and the top sides about 5"...bigger than I expected in the end. I would make them smaller for a child.

100_8411 Sew each pair of black triangles together with the white (already sewn on) sandwiched between, leaving bottom open. (Yes, I sewed the entire perimeter except for an opening for turning, but this is not necessary and my brain just didn't have the foresight to see this...I was in a hurry!

100_8412  100_8414

Turn right side out.

100_8415

Pin together elastic in a circle - use a SAFETY PIN!

(I measured my daughter's head to have an idea of how big to make it.)

100_8417

Try on and re-pin until you get it just right (so it stays on like a headband without slipping):

100_8418 100_8418

Once, you have it right, add 1" for overlap and cut. Stretch the piece along a measuring tape to get an idea of a comfortable stretch amount. (Her elastic was about 17-19" and it stretched easily to 24".) I used 3/4" elastic (I think!), but whatever you would prefer for a headband will work...ok, not 'whatever', I would go with 1/2" or bigger.

100_8419

Sorry, I got in a hurry and stopped taking pictures for a few minutes!

Cut a piece of fleece this stretched length (24" for me), adding on and inch (ish) for overlap (so, 25"). The piece should be twice the width of your elastic plus 3/4"-1" for seams. (So, 2 x 3/4 = 1.5 + .75 = 2.25 or 2 1/4") This will be the head piece.

With front of cat ears facing fleece, align raw/bottom edges of ears with long raw edge of head piece. Sew 3/8" seam - just where ears are. I have my cat ears touching at the bottom corners.

Open out so that ears are pointing away from head piece (long strip).

Fold long edges of  fleece in 1/4" (press if you like...I just held them in place). Fold piece in half lengthwise, keeping raw edges folded to the inside 1/4". Top stitch along this long side, creating a casing for the elastic. Insert elastic. (Be care to hold on to that first end!)

100_8421 100_8422

Pull two ends of elastic together. Overlap elastic 1/2" or more if you like. and stitch it together well - your kid's going to be stretching it a lot.

100_8424 100_8425

Now, pull the two fleece ends to cover elastic, fold in the raw edge if you want, and center the seam on the flat elastic (rather than having the seam at the edge of the elastic). Sew across elastic to hold in place and close strip. Adjust seam to be along center of elastic (so that ears stick up rather than lie against the head).

100_8426 

Try it on!

100_8428

My daughter has really silky fine hair, so for most, the piece of elastic may not need to be so long. Her headband couldn't be too tight or it would just slip right off her head.

Thanks to the long length (and my not quite as beautifully silky hair), it also fits me! (Sorry for the weird face - I'm not so good with self portraits!)

100_8427

Now we were ready to leave!