Thursday, February 7, 2013

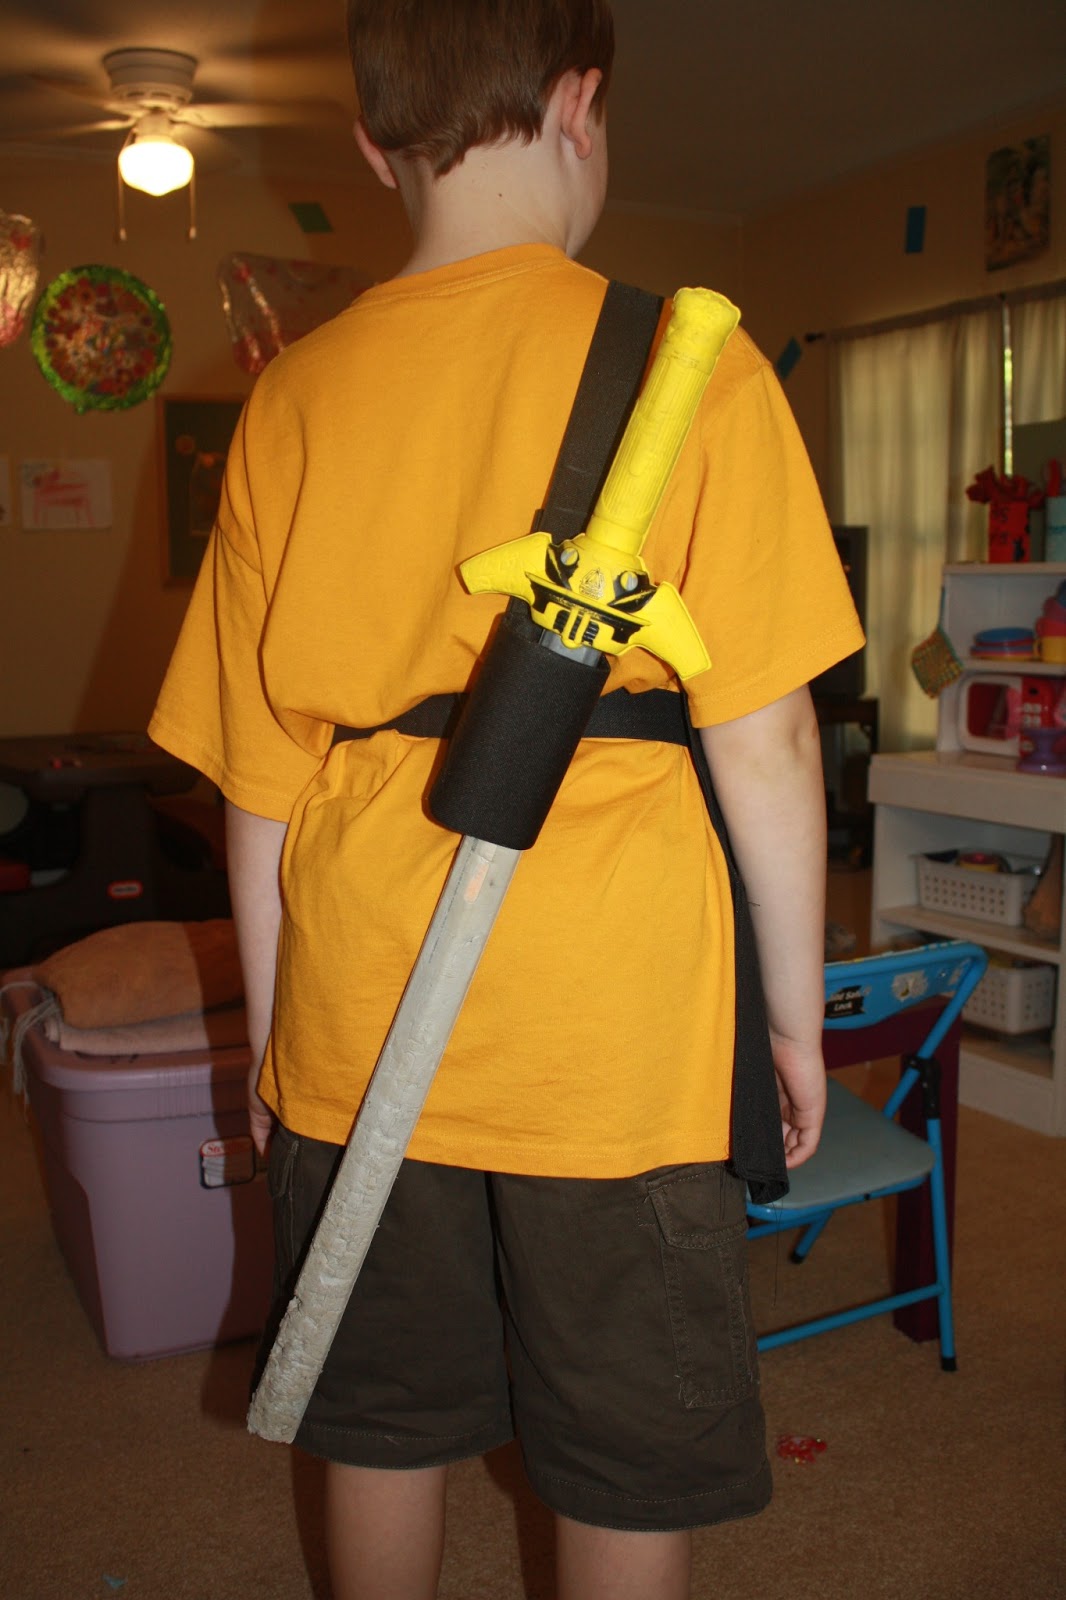
Sword Holster (for artillery belt)

This post is a sequel to the post for the artillery belt. (but you could slide this onto any belt)
The other associated posts are for the nerf dart gun holster and the holster pattern (if you need to make your own).

OPTIONS:  I've made 1 of these for the back belt and 1 of these for the front belt.

I like the look of it on the back, but it is hard for the child to get the sword into, especially if they're young. So the front may be the best choice.
Also, if the back belt is adjustable (as my 2nd time around was designed) or if you're going for a knight-look, you probably want to do it on the front.
If you're going for the ninja look or have a child with too many holsters on the front already (or if your child requests it), go for the back belt.


So, here goes.

You'll need -
some scrap of fabric (same as belt/gun holsters or different) - size depends on length of 'box'
plastic container (I used a crystal light container) - something not much bigger than the sword, but easy to cut
glue - the kind that will glue fabric to plastic and the kind that glues fabric to itself
snaps (or more glue)

1. First cut your container to the length you want. (for the back, I wanted it to be long so that the sword wouldn't flop around much and to have more 'holster' to guide the sword in the right direction. for the front holster, I wanted it to be small so that it could move around as the child walked or be put through quickly/easily.)

I used one of my husband's saws (hack saw?? - one of those sharp dangerous tools hanging above my dryer by the back door) :)  Then, I used scissors/sandpaper to smooth it out...because I totally cut it crooked (thanks to my friend who helped this time).

Last time, I wanted it much bigger to make it easier to get the sword aimed in the right direction going through:


2. Measure around the piece you've cut. We'll call this c. Measure it's height. We'll call this h.
(for me, c = 8.5" or 8 1/2")

(for me, h = 1.25" or 1 1/4"...or close enough)


3. Cut a piece of fabric (c+1") wide x (2h +1/2") tall. Don't let the algebra-like phrasing confuse you - you do not have to solve for c - you already know it...breathe...relax.
My measurements were, c+1 = 8.5+1 = 9.5"
and for the height, 2*(1.25)+.5 = 2.5 + .5 = 3"

For the top edge of the 'crystal light' container, I cut a piece of fabric to be 4" h  x 9 1/2" w
Yes, I cut an extra inch in height...I was testing something - and I had extra fabric, plenty of extra fabric...

(3.5 - you may finish the top/bottom edges of the fabric - these are the edges that are c+1" in length)

4. Fold this fabric in half sideways (so that c+1 is now halved) , right sides together and with 1/2" seam allowance, stitch ends together. You just created a 'ring' which should fit snugly around your piece - flip it right side out and TEST IT, yes, right now - with extra fabric sticking up above/below your plastic container piece. Ok, you can take it off.

You have options now. A, B, and C (A and B involve snaps, C does not require any hardware)
A - the sword holster has a snap on the back and snaps directly to the belt.
B - there is a 'belt' or 'strap' attached to the sword holster that will snap around the belt and snap to itself (to visualize, think: wristwatch)
C - there is a strap attached to the sword holster (in a ring or loop) that the belt can go through
         My insanity got the best of me and there is a comparison chart on these options at the bottom of this post. :)

[Begin option A]
A5. Add a snap to the seam side of the fabric 'ring' so that it's snapping end is sticking out of the 'right side of the ring' and the cap (decorative part of the snap) is on the raw seamed edges inside your ring.

A6. Place your plastic ring into the fabric ring and fold the excess towards the inside. (I recommend folding in the bottom excess first as the top needs to be smoother so the sword doesn't catch on a piece of glued down fabric everytime you insert it into the holster.) If it fits well, unfold, add some glue all inside and glue it down.
Because this one was so tall, I did not make it twice the height plus and inch - I just added 1/2" to 1" to each end and glued in the ends. I didn't want to try and put glue down that skinny tube!

A7. Add a snap (or several if you want it to have location options) to the belt wherever you want this holster to attach onto.


[This is the end of A - if you chose this method, you are done.]

[Method B.]
B5. Cut a piece of fabric about 4" wide and long enough to go through the holster and fold around - top and bottom - onto the inside of the belt.

(no pictures because I had extra 'strap' from making the actual belt strap - if you want pictures - see the strap post)

B6. Fold the long edges of the fabric piece to the middle and fold again in half so that this piece is now 4 layers thick and 1" wide. (Just like we did for the strap.) Again, seam the open and closed long edges and another stitch down the middle. You can also finish the ends of this piece however you like.

B7. Add a snap to each end of this 'strap' - they should be installed so that one overlaps the other when the strap is connected in a circle - like a ring.

(I actually added mine last so that I could size the belt better - I made this up as I went - and then I forgot to take pictures of that...and the gift has been given, so sorry - no pics for this part!)

B8. Lay your snap-strap so that it's center (when attached in a circle) is aligned 1/2" away from the raw edge of the ring. Sew down the center of the snap-strap (your stitch is 1" long) - go back and forth a few times.


B9. Place your plastic ring into the fabric ring and fold the excess towards the inside. (I recommend folding in the bottom excess first as the top needs to be smoother so the sword doesn't catch on a piece of glued down fabric everytime you insert it into the holster. Also, the snap-strap needs to be on this top excess that is folded in last.) If it fits well, unfold, add some glue all inside and glue it all down. (glue the ring to the fabric and glue the snap-strap more firmly in place along the inside of the ring.


You can now attach the sword holster anywhere you like along the belt - just snap it on like a watch/bracelet would to your arm.


[This is the end of B - if you chose this method, you are done.]

[Method C]
This is the only one with no pictures - don't despair - next time I make this - I'll use this method so I can take pictures. :)
C5. Cut a piece of fabric 4" wide and 2h + 1" (remember h is the height of your plastic ring)

C6. (As for the belt and also as in B6 - fold this and stitch it to be 1" wide and the same 2h+1".) In other words, make it into a mini-strap.

C7. Finish raw edges if you like, then align the raw edges  of the mini-strap with the raw edges of the fabric ring - the mini-strap should cover the seam of the fabric ring and should be on the right of the ring (not over the seam allowance of the ring)...lastly - your mini-strap will be 1/2" longer than the fabric ring - just let the extra gap in the middle. 
(This extra will allow your strap to go over the buckle)

C8. Place your plastic ring into the fabric ring and fold the excess towards the inside. (I recommend folding in the bottom excess first as the top needs to be smoother so the sword doesn't catch on a piece of glued down fabric everytime you insert it into the holster.  
    If it fits well, unfold, add some glue all inside and glue it all down. (glue the ring to the fabric and glue the mini-strap more firmly in place along the inside of the ring. Let the outside of the mini-strap, which should gap away from the plastic ring a little, be free of glue.

Now, you can slide it on past the buckle to wherever you want your sword holster to be.

(optional - you could add a snap to this mini-strap where it will meet the inside of the belt, but this doesn't give you much advantage over doing method A - it's really just combining the two for more work, but it is an option.) :)

This is probably going a little overboard, but I couldn't help myself...


Artillery Belt

I attempted a post on this a while back - it was a pathetic attempt to be fast and share the pattern. I won't delete it in case anyone perhaps found it and bookmarked it, but I will edit it to include a link to this (hopefully much more useful) post and the other accompanying posts for the holsters.

This is only the post for the belt - but it will be a several-post series to cover the entire project.
After all posts are complete they will be here:
Belt (this one)
Nerf Dart gun holster 
Sword holster


First off - you'll need some stuff:
I've made this twice - the first time I used outdoor canvas - which is so much better than what I used this time - something from my stash - because walmart didn't have the $5 canvas I bought a few years ago (they claim they still carry it) and I didn't want to pay the ridiculous price elsewhere for a toy project.
I recommend outdoor canvas (it's slick on the back), but if you can't find it - then you can use some stabilizer to stiffen up your fabric for the holsters - I'll show you how.

You'll need:

2/3 - 1 yard of heavyweight or sturdy fabric
parachute buckle
strap adjustable slider
thread to match (fabric)
a dart gun, sword, etc...something to use in this!

Useful tools:
Iron/Ironing board (or heat safe surface)
rotary cutter/mat
sewing machine (ok, this is more than useful unless you've got a month to hand sew!)
The basics - scissors, measuring tape, seam ripper, sewing gauge

Go ahead and fold your fabric so that selvage edges are together and  continue folding in this direction until the fabric fits on your cutting mat - then straighten the edge with a rotary cutter. (Don't have one? Draw a line using a straight edge and a book to keep it square to the selvage edge...then save your money and your 40% off coupon and go buy one for your next project - it's super handy!)

Let's start with the BELT.
Go ahead and heat up your iron.

1.  Measure your child's waist. Add about 5" to the length (minimum) to allow for seams and folding through the hardware buckle. Add more if you want room to grow. This is your strap length.

Making it for a gift? Sizing idea: (My son 2 years ago was 29" at age 8. My 6 year old twin girls are now 22 1/2" and 26" - one is a smaller average and the other is probably 90th percentile at every check up...if this gives you an idea for size guessing. The first time I made this it was for my son. This time around, I made the project for their friend's 6th birthday to go with the dart gun they gave him.)

2.  Cut (from selvage to selvage across your fabric - which hopefully is already neatly folder and you've straightened the cut edge of)  a strip 4" wide for waist belt. Then, unfold and measure to Strap length from step 1, and trim the 4" wide piece to that length. Set aside - this is your belt.

  If you want an over the shoulder strap for a sword or bullet pockets, etc - step 3. Otherwise, skip to step 5.

3. Measure from waist on front right over opposite shoulder to waist on back right/center. Add up to 10" to this measurement. This is your shoulder strap length.

4. Again, cut from selvage to selvage across your fabric - again 4" width. This time, cut the 4" wide piece to the length from step 3. This is your shoulder strap.

5. Waist strap first - fold the strap in half "hot dog style" (so it should be 2" wide and still very long) - and iron a crease.

6. Unfold the strap and fold each long edge towards this crease, and iron again - folding and ironing as you go down. Leave a little gap between the two edges that are meeting along the crease.

7. Fold strap in half so that two folded outer edges are on top of each other - strap is now 1" wide and 4 layers thick (and still the same very long original strap length). Iron well.

8. Sew (topstitch) along open edge where folds meet. Sew close to edge.

9. Reverse and sew (topstitch) along the closed long edge (we just want this to match/be symmetrical).

10. Sew any stitch you like (straight, zig zag, other decorative machine stitches) down the middle of the strap. This helps to keep it all together, and makes it stiffer and more strap like.

11. Now, Shoulder strap - repeat steps 5 through 10.

You should now have 2 long straps (probably different lengths) with unfinished ends. Let's fix that.
Open up those packages of hardware.

For the waist strap, you'll need the parachute buckle.

12. For the female side, just thread the end over the outside of the buckle and back through the hole nearest the buckle, then zig zag or serge the end or fold under, and stitch down to strap so that the buckle has only a little wiggle room. (Note - I put this end on the left belt end.)


13. For the male side, (which should also have the 2 holes for the strap to go through),  thread the strap through the hole closer to the buckle from the bottom, then over the bar and back down through the outer hole. (The strap piece that was threaded should now be on top of the rest of the strap.

*Please make sure to check that your strap is flat all the way around and that, as threaded now, your buckle lines up properly (i.e., one buckle isn't aligned upside down on the strap in comparison to the other when you try to put the belt on.)

14. If all is right, zig zag or serge or fold under twice the end of the strap to finish the end of the loose piece. But do not stitch it down to the belt (as you did the other side) because this is your side that will be able to adjust.


For the shoulder strap. (You can skip to the holsters if you are not doing a shoulder strap.)
These directions for putting on the adjustable slider follow the package instructions - however, I have used other metal sliders that are done differently - if you use an adjustable slider, check your package to compare directions.

15. Put one end of the shoulder strap through the first hole of the adjustable slider (I started with the curved end - rather than the straight side, I did this backwards, but whatever - still works), over the divider, and back down towards strap.

16. Finish this end of the shoulder strap (zig zag or serge or fold under) then sew to strap as close as you can.

17. With other end of strap, go up through middle hole, and over divider, then back down through farthest hole. Continue pulling strap through until most of the strap is through the slider, leaving a "loop" below the slider - this loop will go onto the belt and to the back (of the child).

       If you want the front of this strap to stay in place, you can add a strap or some velcro or a button/buttonhole, etc to keep it in place. (You may have to do this before you do step 18. I didn't bother ...just a thought.)


18. The unfinished end of the strap can now be finished (zig zag or serged or folded under once) and looped around front of belt and sewn back onto itself in place. (The front doesn't need to be adjustablet since the back is, but it is a good idea to leave the loop big enough so that it can go over the buckle in case you want to take it off later.)


(please ignore all the loose thread - I'm really sloppy about waiting until the end of my project to trim all my threads...if then) :)

Bullet Pockets (I'm sure there's a better word for that?)
If your bullets are about this size: (and most are)

Then, these directions should fit it just fine.

I've done them two ways - the first way was more work, but allowed for 2 bullets/hole (and you can only fit about 2 pockets on the strap before the pockets start to go onto the child's shoulder) and the second way was quicker and simpler, but it only holds 1 bullet. (I probably could have resized it for 2 but I didn't want to.)

1.  Cut a piece of fabric 3 1/4" tall and 2 1/2" wide. Hem the sides 1/8". Hem the top 1/8" folded twice.

(showing beginning, then sides hemmed, then top hemmed)


2.  Place the rectangle so that it is raw edge (unhemmed) towards the "up" direction of the shoulder strap approximately where you want the bottom of the bullet pocket to be.  (In other words, the bullet pocket is face down with hems showing and upside down on the strap.)

3. Align hemmed sides with sides of shoulder strap.

4. Flatten excess (middle) to create a pleat.

5.  Stitch across about 1/8" away from the raw edge.

6.  Fold the bullet pocket up so that the upper hemmed edge now is towards the "up" direction of the shoulder strap (in other words, the pocket is right side up with raw edges hemmed hiding inside)

7. Align sides of pocket with edges of shoulder strap and topstitch in place. (bottom to top is best).

8. Top stitch along bottom - hopefully enclosing the raw edge, but if not, it's ok.

Repeat for as many pockets as you wish to put on, spacing them to allow for easy bullet loading (into the pockets).

Next up...dart gun holster.


Friday, February 1, 2013

100 days of school projects

 Every year since 2009 we have had the 'fun' of coming up with another 100 day project for whoever's in kindergarten or first grade. Here are the ones we've done so far:

My son's -  He chose the medium and we thought of things together that he liked or fit the season to make it creative.

50 "stars" + 3 strings for each of 13 "stripes" (that's 39) + 11 strings to spell out "100 strings" =100 strings
(the "i" got 2 - one for the stick, 1 for the dot)

Foam "beads" strung on red pipe cleaners and shaped/twisted into a heart shape.
(he liked flags a lot when he was 5-6 years old. The other was to use up some foam shapes we needed to purge from the craft pile)

Ms. Independent insisted on doing her own thing and refused to accept any of my creative suggestions. She finally agreed 10 stickers to a page so that it would be easy to count (and good practice counting by 10s)

The next year (drat! no picture was taken) - She wanted to use beads, so we strung them on craft wire. She wanted it flower shaped, so we attempted to bend/curve & twist the wire into a flower shape with each petal having 10 beads...it mostly cooperated, and it turned out cute - I take pictures of EVERYTHING - where is my picture of this?

This year we had TWO projects as my twins are in kindergarten - 

My very independent twin decided she wanted a chain "like we make to count down for the end of school".
I suggested felt (since I had most of what we would need) and it wouldn't get torn on the way to school.


 Felt sheets cut into strips and stapled into a chain of rings - just like you would a  paper chain.
(Other than directing and making sure she knew how to use the staple and overseeing she stuck with 'the plan', she did this pretty independently.)


The other looked through my craft surplus and decided to use these little fuzzies (dollar tree - they only come 80 to a pack, so I did have to buy more)

Fuzzies strung on string with a large-eye needle - like you would popcorn for a Christmas tree.


We did find that it was difficult to keep them centered on the needle so that they wouldn't come right off the string - some got a second stitch through it once it was pulled to in place.
I did have to supervise this one a little more:
First of all, there's a needle involved. Secondly, she would push them down the string so hard they all squished together so you couldn't tell one fuzzy from the next. Also, she's the twin that always "needs" help.
Both of these are in sets of 5 (another good counting skill)