
So, turns out, a friend at church that does...everything sewing? :) knew how to make them and showed me an easy way, so I'm here to pass on how to...it took me about an hour per sock (and I got a little faster).
What you'll need:

- crochet thread (I used DMC 30)
- tri-beads (or any other bead with a big enough hole for the crochet hook to go through)
- size 5 crochet hook (for thread, not yarn)
- socks - preferable fold-over cuff with ribs (bobby socks)
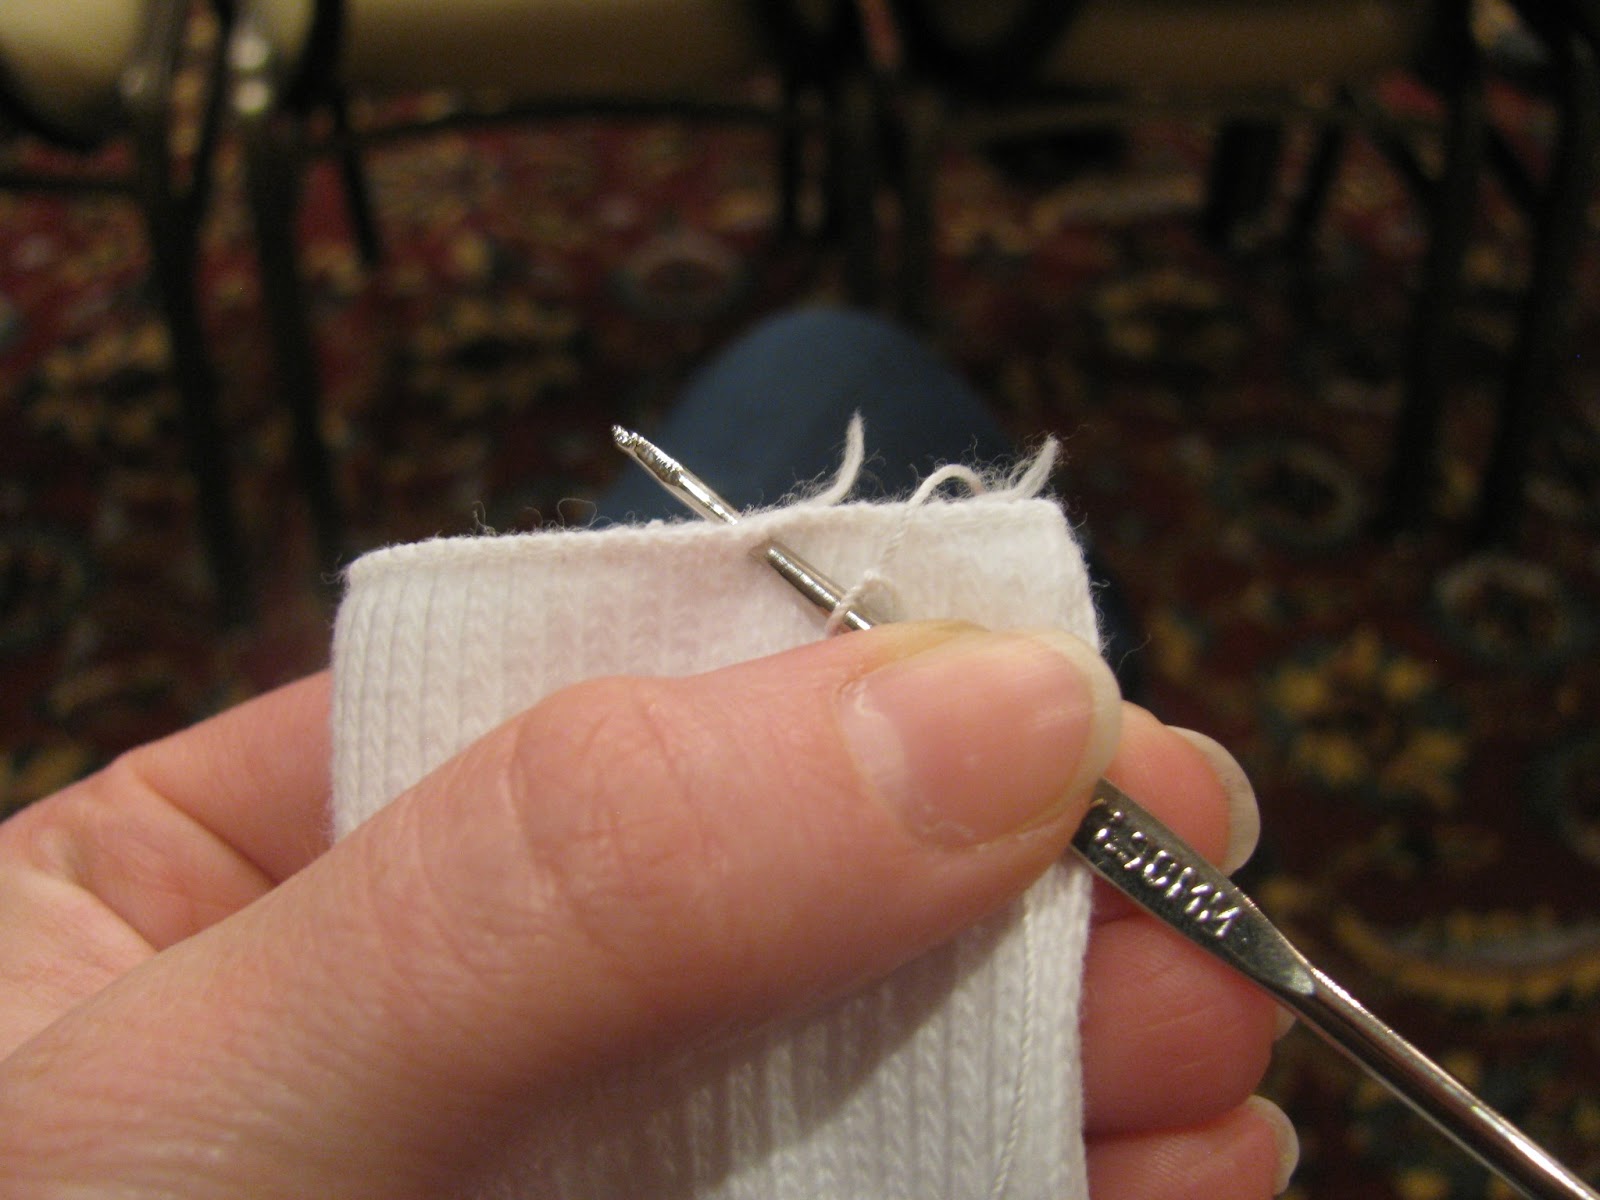
Start by making a slip knot and putting your crochet hook through it (tighten it to be moveable on the hook but with little gap).

Poke the crochet hook through one of the ribs of the sock (really, the space between ribs is where it goes in).
Have the long thread going back over the sock away from you - your left hand will end up holding onto this piece of thread - I twist it around a few fingers to keep it taut.
Bring the long thread (still connected to your spool - the other is your tail - ignore the tail) - over the hook from behind, and catching in it in the hook. (from now on, "yarn over" is the crochet term I use for this)

Pull it back through the sock. (You should now have 2 loops on your hook.)

Again, yarn over - this time pulling it through both loops that are on the hook. ("single crochet")
(I was trying to crochet and photograph at the same time, so I pulled the thread over the from the front for the pic, so the second is a much-later-in-the-process picture but shows the thread from behind - I like it better this way.)


It should look like this now: (and you just did a single crochet)

Chain 4. (Yarn over, and bring it through the loop on your hook 4 times)

Now, put on a bead

Yarn over

Pull thread through the bead (you should have 2 loops on your hook - one of them coming through the hole of the bead.)

Yarn over and pull the thread through both loops (single crochet, essentially). It will be a little tight with the bead up against the hook.

Chain 4:
(that means, yarn over...)

(...and pull thread through loop)

(and repeat 3 more times for total of 4)

(honestly - if I did it too tightly and it didn't seem the same length as the chain on the other side of the bead, I chained one extra - not counting the first chain on this side of the bead in my 4)
Poke hook in the rib 2 away from where you poked the first time.
(Make sure the thread is being held behind where you are working so it doesn't get tangled and pin things down where you want them hanging.

Note on options/preference - You can do every other rib or every fourth rib - You'll go around the sock twice to make two rows - I did every other rib and the second time around, I hit those that I skipped the first because I wanted a very full look. You could do every 4th the first time, and get the center of the skipped 3 ribs the 2nd time around the sock, so there would be finished every other rib. This variation would be faster, but less full. Whatever you like.
Again you're going to do a single crochet:
(yarn over and pull through the sock...)

(then yarn over again and pull through both loops on hook.)

Repeat this pattern of SC (single crochet), CH 4 (chain 4), insert a bead on hook, CH 4 (chain 4)....all the way around the sock. (I rotated 3 colors in a pattern.)

(Here are some more pics of the process just to help:)


When you get all the way around, you can tell you're there because you'll be 2 ribs away from where you started:

Poke the needle through the same rib/hole where you started

Make sure the thread is behind and in between the threaded beads - when you yarn over this time, you'll need to make sure you don't catch the threads from the bead-chains (thread with blue/red beads below) into your crocheting - if you do, they won't hang properly and it will look kind of...wonky (couldn't think of a good real word for the look). :)

Follow through with the single crochet, just as you've been doing all around (just with thread and beads on either side of where you are working).

Now, we're ready for the second go 'round. (Row 2)

For this row, you're going to alternate between crocheting in front of the beads from row 1 and behind the beads from row 1.
To crochet in front of the beads, fold back the triangle of thread/bead (or bead-chain as I'm calling it)...
(See the pink bead to the left and the red bead to the right? The blue bead on its chain of thread is folded back to the inside of the sock. We are going to do a single crochet into that empty rib centered under the bead.)

Single crochet in this skipped rib of the sock:
(Insert the hook in the empty rib between the two "legs of the thread triangle" that are holding the bead, yarn over, pull through the thread,

yarn over again, and pull through the two loops on the hook.)

Now you're ready to chain 4 (just as we did the first time around)

At the end of 4 chains, put a bead on the hook, single crochet (to secure it onto your thread), and chain 4.

(Can you see the blue bead still pushed toward the back? The pink bead from row 1 should be folded to the front. The chain of the red bead just attached (hanging to the right of the hook in this picture) is going to be single crocheted into the rib centered at the pink bead - which, I repeat, should be folded to the front.)

I hope I'm making sense. (Continue as you have been - single crochet into the sock rib, chain 4, attach a bead, chain 4, single crochet into the next free sock rib, etc)
For one more picture on this process:
I attached a blue next (pink is folded to the front still), and I will attach it under that next red bead, which I will fold to the back.

When you get all the way around to where Row 2 started, find where the first crochet of row 2 is - that's where you want to put your hook. (Single crochet like you have been to secure this last bead/chain into the sock.)

Now, do a slip stitch - (don't go through anywhere, just yarn over and pull the thread through the loop on the hook), but before you pull the thread through the hook...

Clip your long thread (detaching from the spool) - and pull. It should make half a knot.

Take this tail and the first and tie them together into a good knot. Clip off any excess thread.

And you're finished.

Now, make another.

The pattern:
Disclaimer: Please correct me if you read through this pattern and notice I got anything wrong or worded oddly - I can read crochet patterns, but I have never written one. I learned this by watching someone and turned what I learned into a tutorial, but making it into a crochet pattern is another thing entirely.
Beaded Sock Crochet Pattern
(Start with a slip knot on the hook)
Row 1:
SC in rib of sock
*CH 4
Put 1 bead on hook, SC 1
CH 4, skip next rib of sock
SC in rib of sock*
**Repeat all the way around, SC in every other rib of sock (with a bead chained in between ribs) until you reach the first rib you began in.
Row 2:
Fold bead-chain from row 1 to inside of sock.
SC in very next rib of sock (centered under this bead-chain)
CH 4
Put 1 bead on hook, SC 1
CH 4, skip next rib of sock
*Fold next bead-chain from row 1 to outside of sock.
CH 4
Put 1 bead on hook, SC 1
CH 4, skip next rib of sock
Fold next bead-chain from row 1 to inside of sock.
SC in next (empty) rib of sock
CH 4
Put 1 bead on hook, SC 1
CH 4, skip next rib of sock*
**Repeat all the way around, alternating where row 1 is folded and SC in every other rib of sock (with a beach chained in between ribs) until you reach where row 2 began.
Finishing:
Cut thread, leaving a tail. Sl St. Knot the tails well and trim excess thread.
Now, make lots and lots of pairs for all the little girls you love.

My 3-year old calls these her "singing socks" (because of the noise they make when she jumps and bounces around).
7 comments:
THANK YOU SOOOOOO MUCH!!! I have been looking for a tutorial on how to make these socks for a long time now and was completely lost! Now I can't wait to go buy some socks and get to work :) Thank you!
Delina
THANK YOU SOOOOOO MUCH!!! I have been looking for a tutorial on how to make these socks for a long time now and was completely lost! Now I can't wait to go buy some socks and get to work :) Thank you!
Delina
Thank you so much for such clear, concise directions, you are an angel, and very good w/your directions.
What a blessing! I so wanted to make my daughter socks...I make her bows & clothes...but socks was the last thing to conquer, so I Googled crochet beaded socks and after reading through a few different tutorials I came across yours AND it was splendid! Super clear and easy directions! I'm a SUPER novice crochet-er and I was able to follow aND make socks easily! Thank you for sharing, you were such a blessing! God bless!
my grandmother made these for me my whole life, and now i’m relearning so i can make these for my nieces. thank you so much for helping me carry on that sweet memory!
Wow, thank you from a VERY beginner crotcheter. I needed this tutorial with pictures and easy to understand directions. THANK YOU!!
Thx for making this tutorial. . . Much appreciated.
Post a Comment